Things covered under this section:
- A. Received files
- B. Review Page
- C. DDP (Document detail page)
- D. Export
- E. Export Error
- F. Archive
- G. Contact overview
- H. Some settings
- I. Dashboard
- J. Upload files
1. Add administration to Smartbooqing
Once you’ve registered to Smartbooqing, in order to get the Administrations in the Smartbooqing you need to import them from your accounting system. Steps to import Administration:
-
- Once you’ve logged in to Smartbooqing, you will be able to see ‘Administrations’ in the left hand side options panel.
- Click on ‘+Import administration’ for importing administration(s) as shown below.
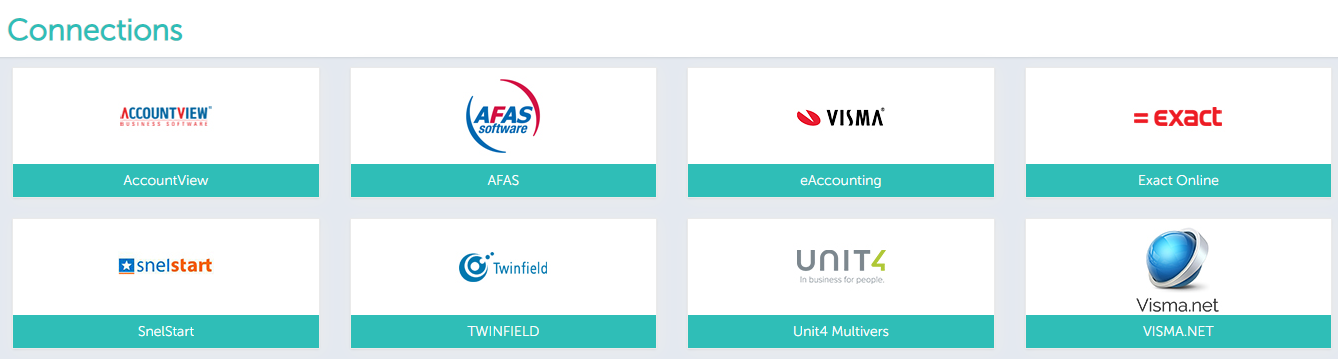
- Currently we support 7 accounting systems; select anyone for which administration(s) has to be imported.
- Twinfield
- Exact online
- AFAS online
- Account view
- Visma eAccounting
- VISMA.NET
- Snelstart
4. Let us select ‘Exact online’, and Click on it you are navigated to exact online site
Add credentials for the below screen:

5. Once you are logged in, it is redirected to Smartbooqing with list of administration(s).
6. Select the administration and in the next screen; system need CoC for better processing, so provide CoC and click on Import. Now the administration will get imported into Smartbooqing.
You can read more in the section “Connections“.
2. User and User Roles
| User Roles | Administrator | Team Leader | User+ | User | Document Reviewer | Reviewer | Portal Invoice User | Submitter + | Submitter |
| Rights | |||||||||
| Manage organization settings | Yes | ||||||||
| Manage connected accounting systems | Yes | Yes | |||||||
| Add administration | Yes | Yes | Yes | ||||||
| Add users, divisions, templates | Yes | Yes | |||||||
| Update processing settings | Yes | Yes | Yes | Yes | |||||
| View Contact list | Yes | Yes | Yes | Yes | Yes | Yes | Yes (only view) | ||
| Submit documents | Yes | Yes | Yes | Yes | Yes | Yes | Yes | Yes | Yes |
| Review documents | Yes | Yes | Yes | Yes | Yes | Yes | |||
| Access archive | Yes | Yes | Yes | Yes | Yes | Yes | Yes | Yes |
3. Add a User:
Once, you have logged into the SmartBooqing as an Organization, at extreme left-hand side panel you can see the option of ‘Users’.

On the right-hand side, you can see a button ‘+New’ to add a new user.
4. Editing User
Once, you have added a new user in any of the divisions. Please follow the below steps-
1. Select any user by clicking the checkbox in front of it, you will find the ‘Edit’ button on the upper right-hand side corner. Alternatively, you can also click on the User name directly.

2. Once you are in edit mode, you have two actions:
a) Edit ‘Basic’ details

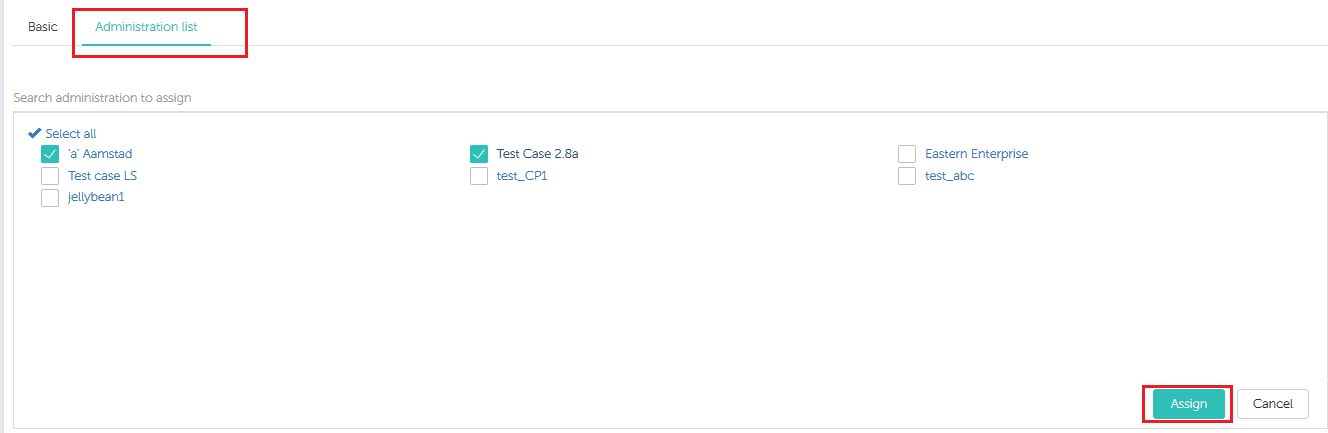
b) Assign administration(s): Here, you can assign the Administration(s).Click on search bar, you see list of administration(s) to assign.
5. Add division:
While, adding a new division, you have to click on the ‘Division’ option from the left-hand side Options Panel.
1. New Division: on the Division page, you click on ‘+New’ button to add a new division for that particular Organisation, as below.

2. Clicking the option ‘+New’, you will get a pop-up to enter the Division Name, click ‘Create’.
3. With this, a new division will be added to the particular organisation.
4. How can I add different Administrations to any Division?
Once division is added, you can select the checkbox in front of the division name and click on ‘Edit’. Alternatively, you can click on the division name to open and edit it.

- After this, you can add the desired Administration(s) to that particular division, as shown below.

- Now click on Search administration and the list of administration for the particular organisation will come up.
- Select the desired administrations and click ‘Assign’
- You can view all the assigned administrations in that particular division.
You can read more in the section “Managing Division“.
Workflow in Smartbooqing:

You have five steps as below:
- Login: Go to URL- https://pilot.smartbooqing.com/en/signin and you will land on login page.
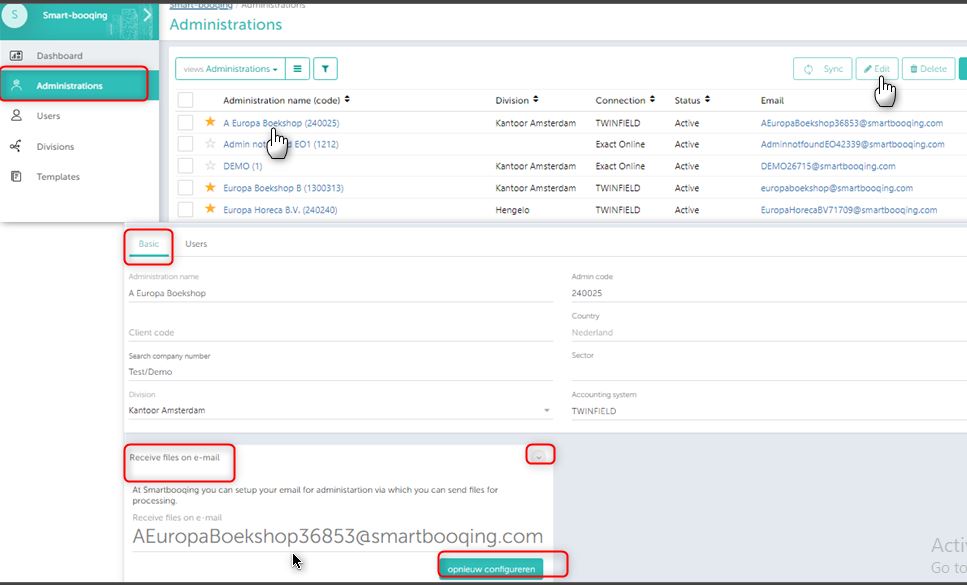
- Submit documents: Documents can be submitted Via Mail or Portal. Each administration is given an email address in SBQ. Documents can be mailed on this email address. This email address is known at the time of creation of new administration and later one can find it under the list of administrations.
- Review: Once the documents ready for review, you’ll be notified through mail. Go through review page, provide the essential data and export the documents.
- Export: The documents, which you export from review page, will be exported to your accounting system. In case, system finds some mandatory data is missing then system will throw export error.
- Archive: The documents, which are exported in your accounting system, a copy of those documents, will be saved in Archive for future reference.

A. Received Files
This tab consists of all the documents that you have submitted via mail or portal.
You can read more in the section “Tracking received files”.
B. Review section
Here, the documents processed by system are pending for review.

The page is categorized into three sections as: –
- Document with comments: The documents with comments indicate that you have to take some action for those documents according to the comments mentioned. You can export the document to the Accounting System by clicking the ‘Export & next’ button.
- Document without comments: Click on ‘Export All’ button to export the document (s) to the Accounting System.
- Document with closed comments: In this section, Senior can verify the document, which were reviewed by the subordinates. Click on ‘Export & next’ button to export the document (s) to the Accounting System.
You can read more in the section “Reviewing Document“.
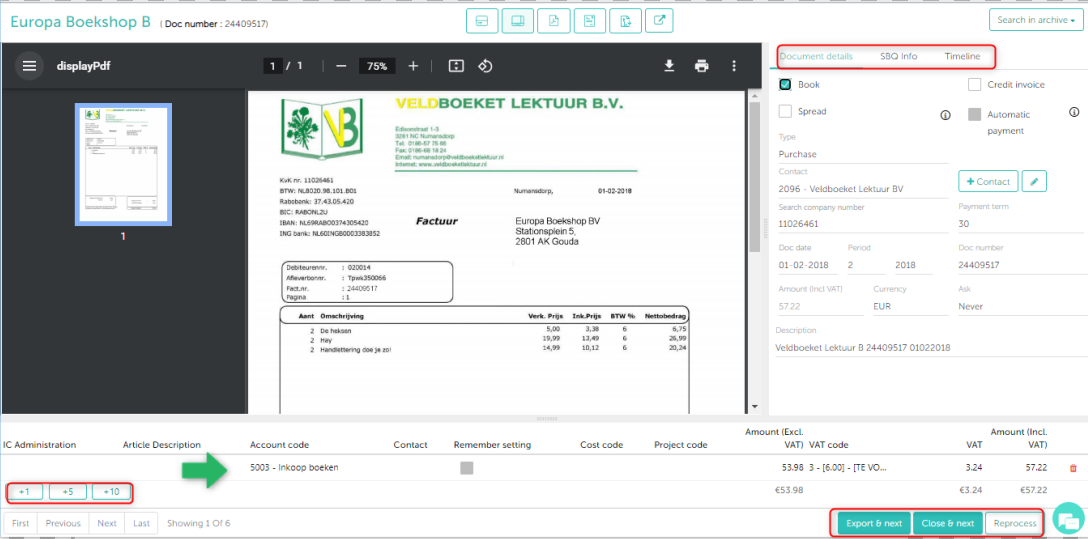
C. Invoice detail page /DDP (Document detail page)
- DDP is an epic tool to view your invoices with remarks and take the mandatory actions (at required places), Export invoice to the accounting system or inform us for the same scenarios what should we do next time and we will remember that moving ahead.
- Click on the magnifier in front of any invoice, it will take you to the IDP
- You can read more in the section “Document Detail Page“.
![]()
D. Export:
You can export / send documents to the accounting system from different places.
- Exporting document from DDP-Document Details Page
- Exporting document from Review Page (Login >> Select Administration >> Review)
- ‘Exporting Error’ section. You can use the button Re-export. (Login >> Select Administration >> Export Error)
E. Export Error:
If your documents were not exported to the accounting system due some reason, then you can re-export them from the ‘Exporting Error’ page by making required changes and click ‘Re-export’ button.
In this section, you can find two sections for your easy reference.
-
- Export error- Contacts
- Export error- Documents
Expanding the preferred section from above two sections, you can Re-export the documents, as shown below.

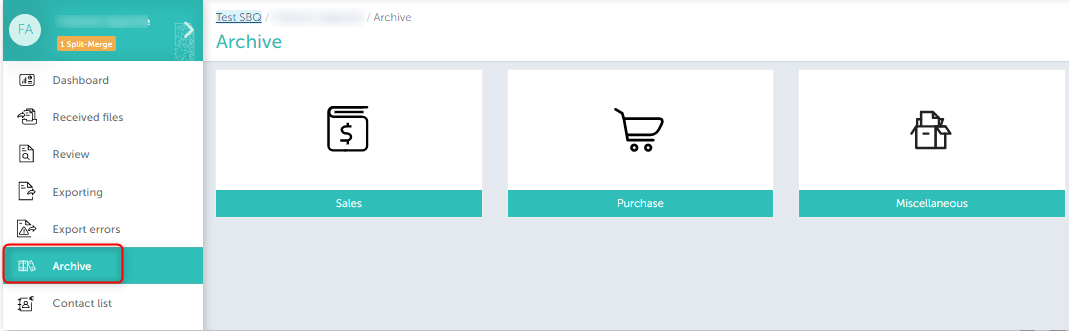
F. Archive:
The archived documents (ie documents which are exported to the Accounting System) in the ‘Archived’ section.
G. Contact overview:
- Once, you are logged in and select the Administration, on the left-hand side you will find an option ‘Contact list’.
- In contact list, you will find all the contacts for that particular Administration. If you want to adjust the settings, you can do it on the same page.
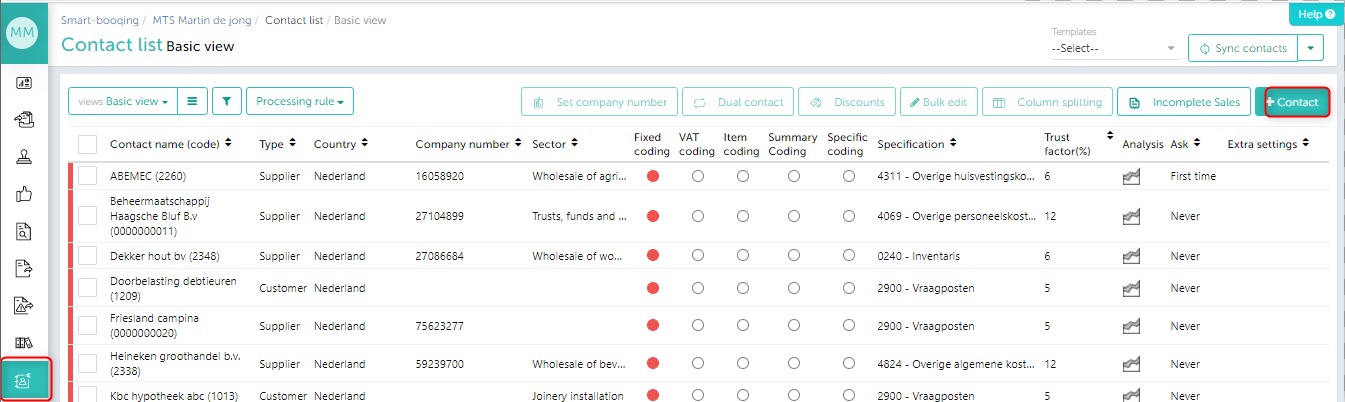
- To make the changes by editing only one contact, you can double click on that row, that relation will be converted to the Edit mode, and you can make the desired changes in the settings.
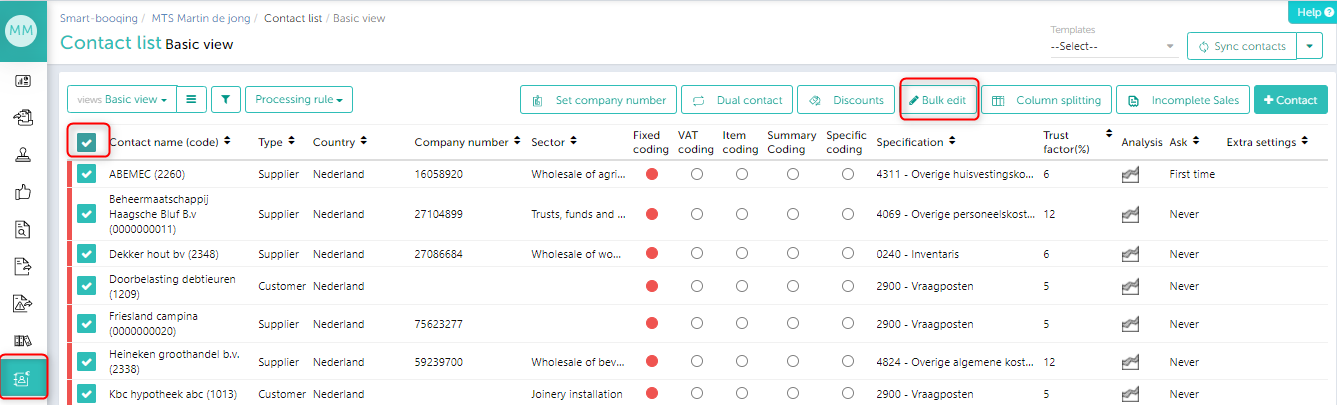
- In addition, there is an option of ‘Bulk Edit’ for your easy reference. This option will be enabled when you select more than one checkboxes in front of different rows.
- With above option ‘Bulk Edit’, all the settings will be applied for all the selected contacts.
You can read more in the section “Contact“.
H. Some settings
Settings options explained briefly:
H. 1. Basic Settings:
- Fixed Coding: All of the contacts can be processed on a fixed account code.
- VAT Coding : The account code is based on the VAT percentage namely, 0%, 9% and 21%.
- Item Coding: The products define Account codes or articles, for each item there will be a different account code and invoice will be processed line- by- line.
- Specific Coding: Articles, which cannot be considered in generic product groups, are specific. For these kind of articles, we can have setting specific coding.
- Summary Coding: The invoices of these contacts are always having a summary either on the start or at the end of invoice page.
H.2. Advanced Settings:
- Set CoC: Use this option to set the CoC number for this contact. You can also set CoC for multiple contacts at a time.
- Dual Contact: This setting option enables you to change the type of the contact/invoice from sales to purchase or vice versa. While doing this you need to select an option and give the keyword(s).
- Discounts: This setting gives you options to set the rule for discounts, you can set a rule accordingly. There are three options-
- Percentage
- Fixed amount
- Discrepancy amount
- Column Splitting: For this setting, you need to contact or inform Smartbooqing support/helpdesk team, well in advance. In order to give you access to make column-splitting settings, our team will make the necessary settings at the back end and then you will be able to do the settings for column splitting.
- Settings applied: This column will show you the extra settings made for this contact, like cost code, partner code, etc…, these extra processing settings will be displayed in the form of Icons.
- Partner Coding: We can set partner code based on relation or account code or you can set it manually from DDP.
- Project Coding: We can set project code based on relation or account code or you can set it manually from DDP.
- Inter Company: With this setting, you can book invoices on other contact’s particular account codes.
You can read more in the section “Processing Setting“.
I.Dashboard
Once you are logged in, the landing page is the user dashboard. User dashboard has overview of administrations, users, files and actions to be taken.
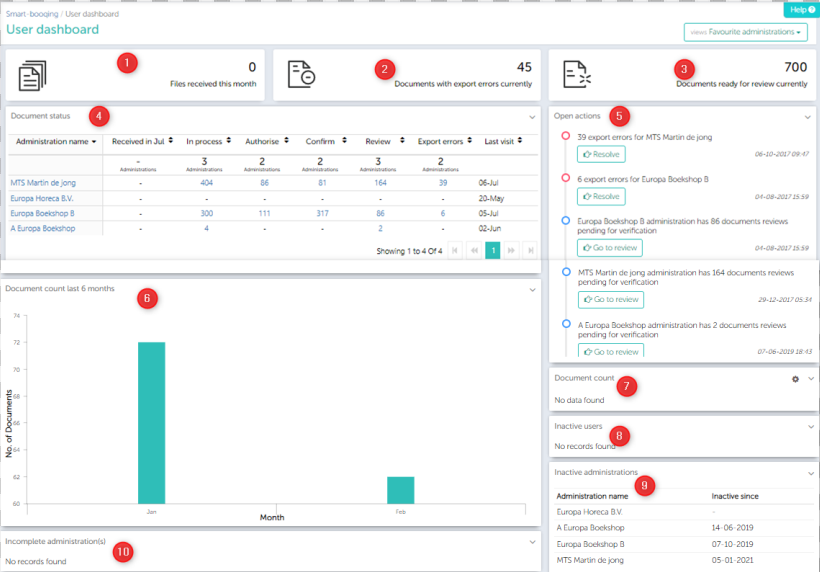
The dashboard has the following widgets to help you perform your day-to-day tasks.
- Files received this month: Count of files received for the current month
- Documents with export errors: Count of files which system could not export to your accounting system due to some mandatory data missing.
- Documents pending for review: Count of files which are processed by system and waiting for your review.
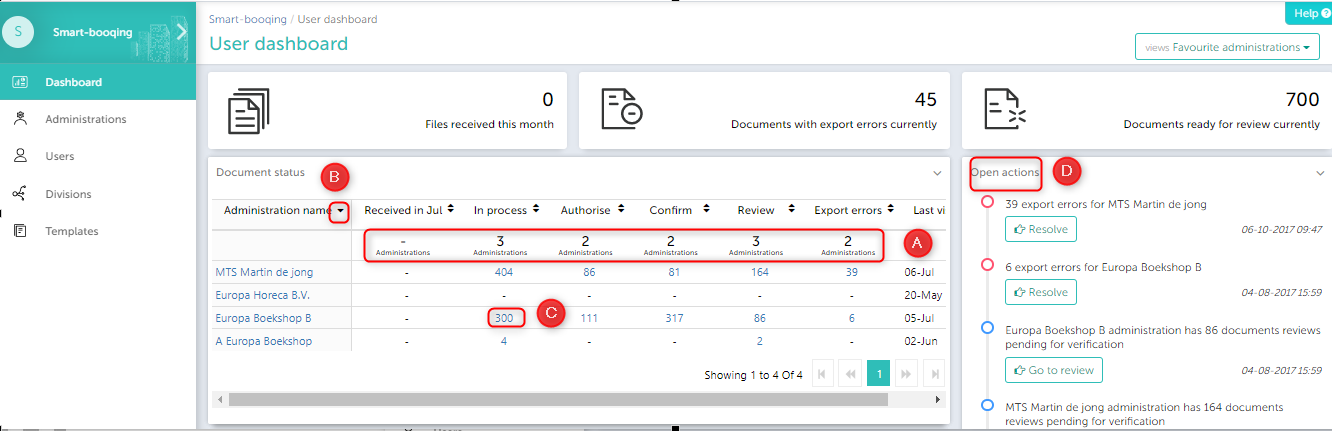
- Document status: Gives the count and the current status of the documents processed by the administrations. When you click on the administration name, the administration opens in a new tab. Likewise, if you click on the ‘number’ mentioned below any columns(review, export error, etc) you will be directly directed to that respective page.
- A. Count of Administrations which need actions is displayed as first row (Non-editable)
- B. You can sort items on all columns. Default sort is on ‘Review’ column.
- C. You can directly click on the counts for respective column, which will direct you to respective page, below.
- D. Now; You don’t see open actions for export error, review, authorizer, confirm
5. Open actions: Here, you see actions to be taken by you.
6. Document count last 6 months: The graph is more self-explanatory, which indicates number of documents processed in last 6 months.
7. Document count: You can set a target for the month that ‘how many documents you will be processing?’ to do so click on settings icon.
i. Click on the below icon and then click on Edit.![]() ii. You see small pop up, set the target.
ii. You see small pop up, set the target.
8. Inactive users: The users, which are not logged in from past 6 months.
9. Inactive administrations: The administrations, which are not logged in from past 6 months.
10. Failed to configure administration: Import of administration can be failed in case system did not find mandatory fields (‘account codes’, ‘control codes’, ‘daybook’) from your accounting system. You can synchronize the administration with the help of the sync button present.
J.Upload files
You can upload your invoices via:
1. Upload from portal:

2. Upload via email:
You can read more in the section ‘Sending files‘ .
3. Upload from app: You can read more in the section ‘Mobile app‘ .
4. Digital invoices: Smartbooqing can process e-documents instead of PDF invoices. You can read more in the section ‘Digital invoices.