In this article you will find information about:
About the Review page
On this page, you can find processed documents that can be verified and exported to the accounting system. Our users can export single or multiple documents at a time. The purpose of this page is to verify documents with alerts/comments generated by the system.
How can I go to the Review page?
From the options panel on the left-hand side, you can navigate to the ‘Review’ section. All processed documents can be found here. (Login → Select the Administration → Review).

Information available on the Review page
On the Review page you will see the following statistics:
- Total number of documents.
- Purchase: Purchase documents with comments / total number of purchase documents.
- Sales: Sales documents with comments / total number of sales documents.
- Miscellaneous: Miscellaneous documents with comments / total miscellaneous (non-bookable) documents.
- Pending actions: This notification pertains to all open actions within the entire administration, not limited to documents. The dashboard displays the precise number of open actions.
Different features/user actions available on the Review page
The following section explains the different features/user actions that are available on the Review page.
You can check the booking details (account codes and VAT etc.) displayed on the Review page.
View:
- Up-to 3 articles lines (with codes) are shown.
- The respective processing rule is also displayed for each document.
- If the user wishes to see more than 3 article lines, they can click on the magnifying glass for that document. This will redirect them to the document detail page.
Edit:
- Coding rules (fixed, VAT, article, specific and summary coding) can be changed by visiting the document detail page (DDP).
- Ledger codes can also be edited. The edited codes will be indicated in blue.
- When you edit a code, a checkbox will be displayed. If the checkbox is checked, the same codes will be applied when the documents are submitted next. If it is unchecked, the changed code will not be applicable for the next time.

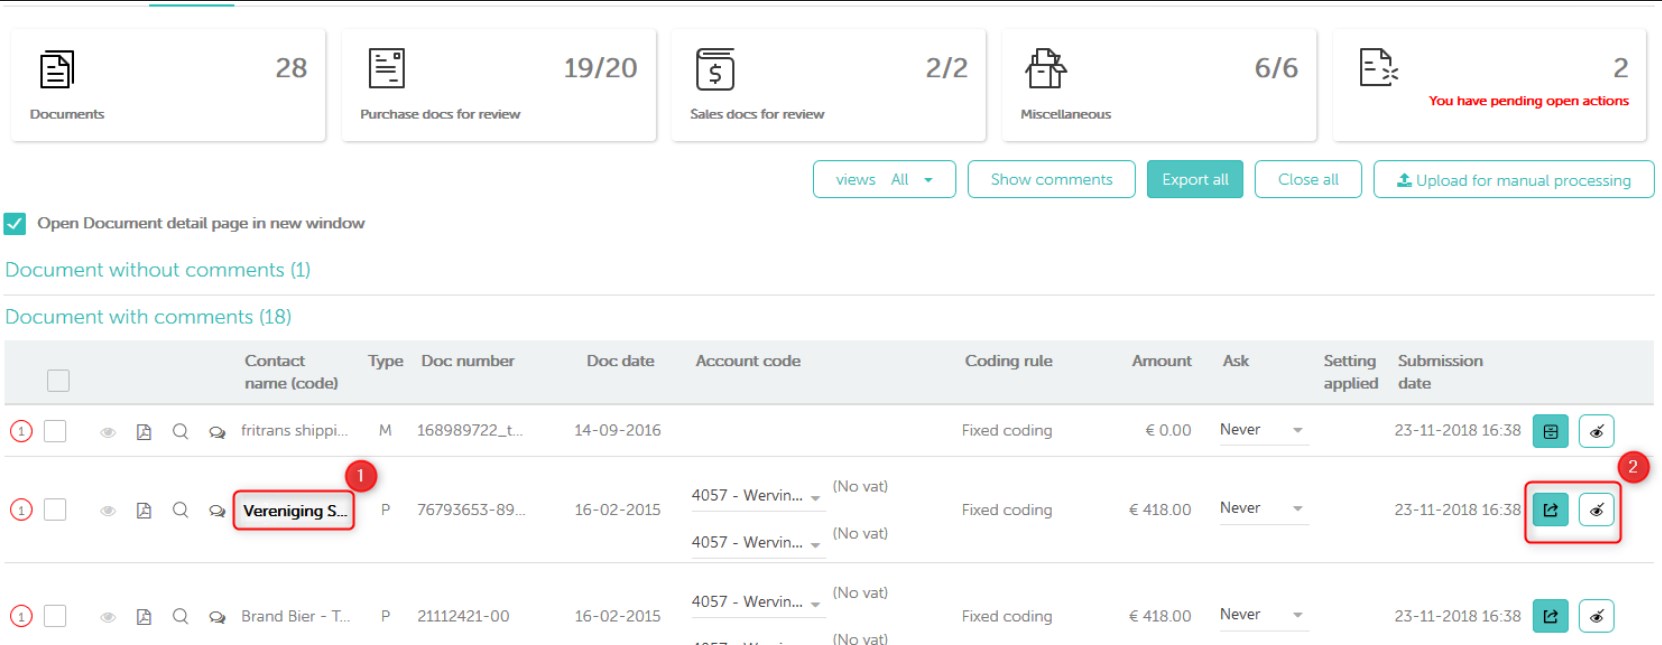
- If there is a new contact for a processed document, it will be highlighted in bold.
- There are buttons at the end of each document row to Export, Archive and Close that document.
- Export: Click this button will export the document to your accounting system. Will not work for the documents that are mandatory to review i.e. indicated by red circle, or incomplete document i.e. indicated by magnifier with exclamatory mark.
- Archive: The document will be moved to a repository which keeps record of all exported or non-bookable document in Smartbooqing.
- Close: Document will be moved to ‘Document with closed comment’, to facilitate a secondary review before export.
- For ease of use, we also display the PDF on mouse hover over the document number and document date columns.

Filtering/Sorting documents on the Review Page
The Review page allows you to Sort or Filter/Search documents as per your needs. The filter/search feature assists users in finding specific documents based on criteria such as Contact, Document number, Submission dates, Coding rules, and Type of invoice. This feature can be found as follows:
The sort feature can be found as shown below. From here you can select the appropriate sorting option.
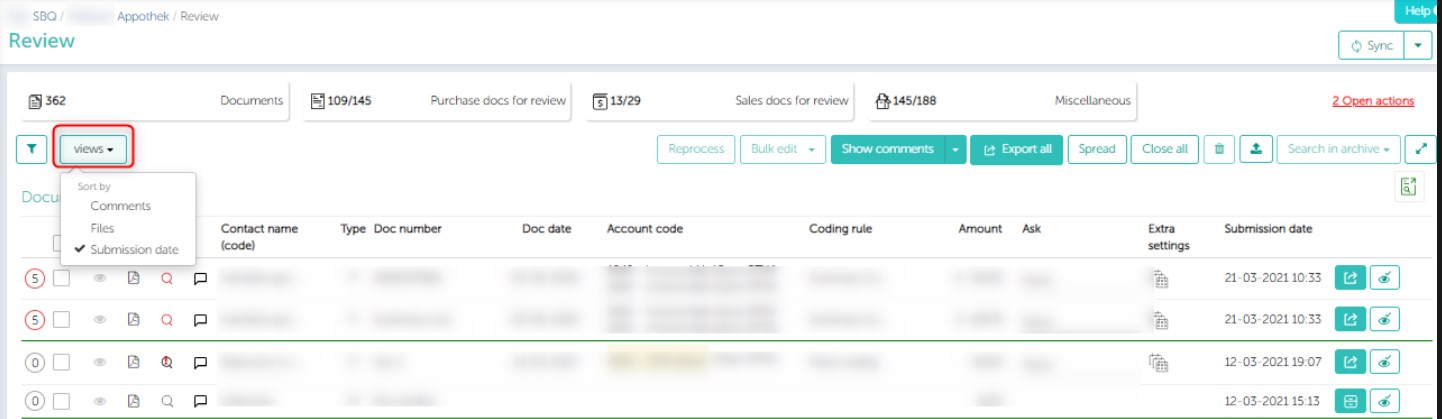
Sorting can be done on the basis of:
- Comments: If you want to view invoices distinguished on the basis of the comments associated with them, you can select this view. This is the default view selected for sorting.
- Files: Documents from the same file (submitted together) will be grouped and separated by a green line, with the most recent on top (in descending order).
- Submission date: Documents will be grouped based on their submission date and separated by green line. Users can choose the list to be in Ascending or Descending order.
- Document date: Documents will be grouped based on their submission date and separated by green line. Users can choose the list to be in Ascending or Descending order.
Note: Submission date column shows the time, the time format is (hh:mm).
The other user actions that can be taken are the following:
- Reprocess: You can select documents for reprocessing and submit these for reprocessing.

- Bulk edit account codes: It allows you to change account codes of multiple documents that have the same coding rule. Click here to read more.
- Show/Hide comments: Selected documents will get an expanded view of their comments, covering all the associated remarks in detail.
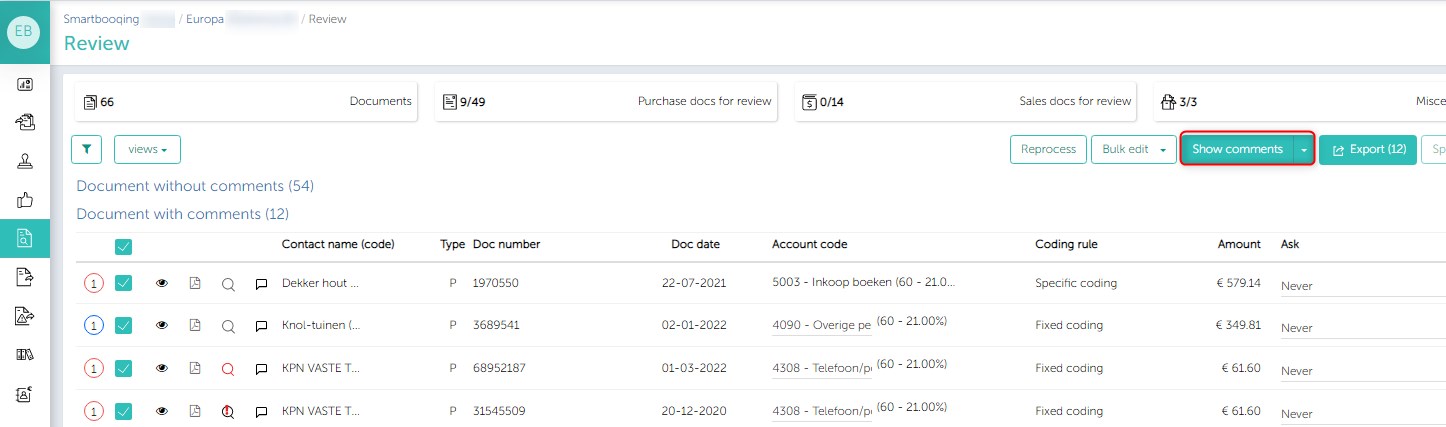

- Export: By clicking this button, selected/all documents will get exported. However, documents that are to be mandatorily reviewed (indicated by a red circle), will not be exported. You need to review them by click on this circle and then export them manually.
- Spread: This feature allows users to ‘Book over a period,’ enabling them to split the amount between desired periods. This setting is helpful for managing advance payments and installments for your bills. Click here to read more.
- Close: Selected/all documents will get shifted in closed comment section. However, documents that are to be mandatorily reviewed (indicated by a red circle), will not be exported. You need to review them by click on this circle and then close them manually.
- Delete: This option appears after you select any of the documents. This option will delete the selected invoice from list. It is then considered cancelled and will not get exported.
- Search in archive: You can look for similar invoices that have been processed in the past by Smartbooqing in this particular administration. Click here to read more.
- Upload for manual processing: With this action you can quickly upload any invoice and enter the details manually. There won’t be any review required for the same and you can export the invoice details in your accounting system within a minute.
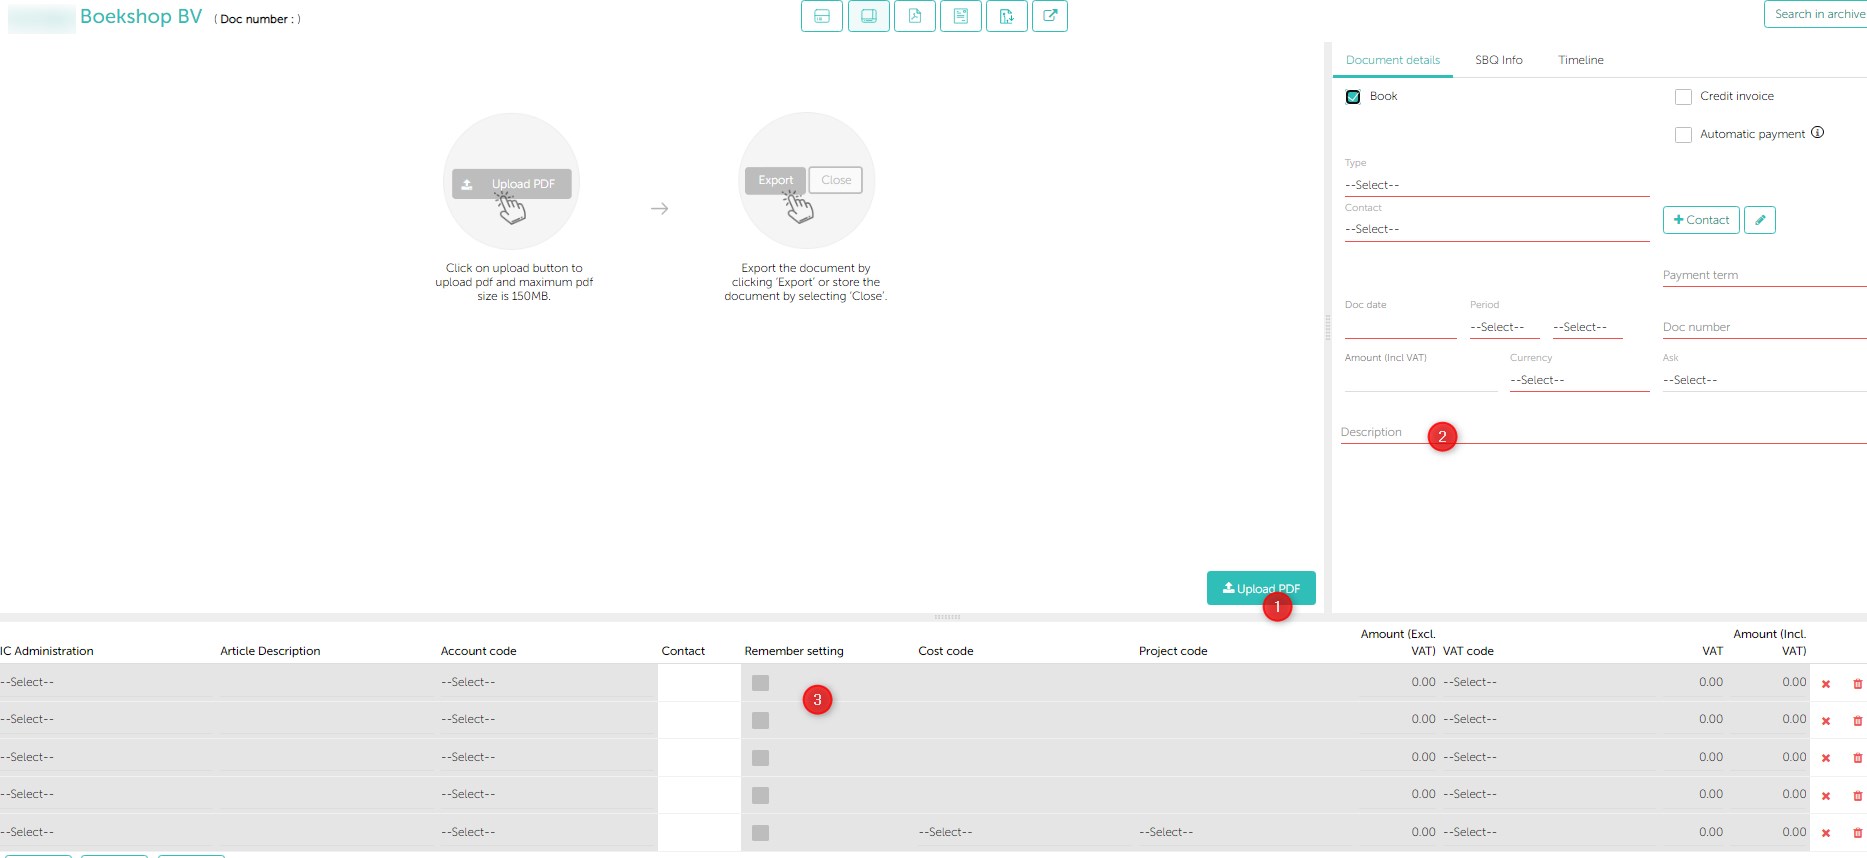
How to manually upload a document from the Review Page?
Step 1: Click on the ‘Upload for manual processing’.
Step 2: Upload the invoice (once you’re redirected to the Document Details Page).
Step 3: Enter the required details for the invoice description.
Step 4: Click on ‘Export’.
Once you open any invoice from the Document Details page (by click the magnifying glass), you will be able to do these actions:
- Export & next: This button is to ‘Export’ the invoice directly to the accounting system.
- Close & next: This button will save the changes made and will close that particular review section. The invoice will then be moved to the ‘Documents with closed comments’ section.
Comments
Invoices will get categorized in the following three categories:
- Document with comments:
- This section covers all the documents which have comments/remarks generated by our system during processing. These comments indicate that the user has to take some action for these documents after reviewing the comments.
- When you have taken the respective action for any document, you click on ‘Close & next’ button. The document will be removed from this section and moved to the ‘Documents with closed comments’ section.
- You can expand the comments and perform actions by clicking on the circle next to the document.
- You can also directly export the document to the accounting system by taking the necessary actions and click ‘Export & next’ button.
- If invoices are of non-bookable type, they will not get exported to your accounting system so you can archive them instead.
- Documents without comments:
- This section covers all the documents which are not having any comments.
- You can directly click on the ‘Export All’ button or select particular document(s) and click on ‘Export All’ button to export that document(s) to the accounting system.
- Documents with closed comments:
- This section addresses all documents for which actions have been initiated following review in the ‘Document with Comments’ section.
- From here you can only export the document to the accounting system by a simple click on ‘Export & next’.
Notes:
- The status of the exported document can be tracked in the ‘Exporting’ section.
- Documents that are have some error(s) while exporting, can be viewed in the ‘Export Error’ section.
Different Icons Explained
- Eye: This icon will indicate that the document has been opened or reviewed by a user.

- PDF: Clicking this icon will give a PDF view for that specific document.

- Magnifier with no color: This icon will take you to the Document Detail Page (DDP). You can open the document on the DDP to simply view the details, or alternatively, take action directly from the ‘Review’ page if necessary.

- Magnifier with red color: This icon serves as an indication that you are required to take action from the Document Details Page.

- Magnifier with red line: This indicates that the document has incomplete fields that need to be filled in. Clicking on it will show red underlines indicating the required fields.

- Chat icon: This icon will navigate you to the ‘Events’ section on the Document Details Page, where you can view comments made by others (chat history) on the left-hand side.

- Number with a red circle: This will indicate the number of comments for any particular invoice. It will show the total number of comments i.e. notifications and mandatory actions to take.

- Number with a blue circle: This indicates that the particular document only has notifications, you are not necessarily required to take action before exporting the document to the accounting system.

- Closed eye concept: It indicates that the document is already reviewed by you or by your colleague. All documents that have been closed are placed in the ‘documents with closed comments’ section, marked with an eye and tick symbol indicating it has been reviewed.

Color Codes:
- Red: Need to take action on the Document Details Page. The review is mandatory.
- Blue: Notifications, not mandatory to take action on the Document Details Page. The document can be exported.
Side Bar to get basic view:
Clicking the PDF icon opens the sidebar view, allowing you to access details such as ‘Document Details,’ ‘Timeline’ for comments and status, and also the ‘PDF’ view.

Merge documents
Merging documents can easily accomplished by dragging the source document and dropping it onto the target document.
By applying filters, documents can be arranged as needed, facilitating easy merging when required.
You can merge only two documents at a time, as illustrated below:

- When you merge the source document into the target document, the source document will be removed from the review page.
- When you merge documents, you will see an icon indicating that the documents have been merged, as shown below:

Note: You cannot undo the merge to split the documents again.
New Relation to Existing Relation Functionality
If you believe that a new relation should not be created and processing should instead continue using an existing relation, you can use the NR–ER (New Relation to Existing Relation) feature. This option is available when the the document has been processed on a new relation.
Steps to perform an NR–ER mapping from the Review page:
- Expand the Comments section.
- Set “Is Existing Relation” to Yes.
- Select the existing relation.
- Select the appropriate option from the drop-down menu for account code changes.
- Click Reprocess to apply the changes.

Account Code Handling Options
New Code & Export Directly
- Saves the selected account code.
- Reprocesses the document using the updated details and export directly.
New Code & Confirm on Review Page
- Saves the selected account code for future use.
- Archives the current document as a miscellaneous document.
- Creates a new instance of the invoice and reprocesses it.
- Places the reprocessed invoice on the Review page for confirmation.
Reprocess
- Archives the current document as a miscellaneous document.
- Creates a new instance of the invoice and reprocesses it.
- The document follows the normal workflow from that point onward. For example, if it was previously at the Confirm stage, it will return to Confirm after reprocessing.
- The account code change is not saved for future processing.