In this article you will find information about:
1. Introduction
4. Login
5. PIN
5.1. Set PIN
5.2. Forgot PIN
7. Home
7.2. Filter
8. Upload documents (Gallery / Camera)
8.1. Camera modes
8.1.1. Steps to capture “One document with many pages”
8.1.2. Steps to capture “Multiple documents of one page each”
8.1.3. Steps to capture “Multiple documents with many pages”
8.2. Gallery
9.1. Grid view
9.2. List view
11. Menu
11.1. Profile
11.2. Confirm administration
11.3. Delete history
11.4. App gallery
1. Introduction
Smartbooqing mobile app allows you to capture and upload documents from your smartphone easily. You can capture several documents at once and then upload them to the administration.
2. Prerequisites
- By default, mobile app settings are activated for all the administration. If in-active, please contact your Administrator for the same.
- Mobile app user must be an active Smartbooqing user.
- If mobile app user doesn’t have an account, then it needs to ask the administrator to get themselves added as a new user.
- The Administrator, can add the user from Smartbooqing portal. A password activation email is sent to user, to set the password. Once user is added, assign administrations to the user from Smartbooqing portal.
- Download the mobile app.
- Login to the mobile app using Smartbooqing credentials (username and password)
Note: Operating systems that are supported and compatible:
- Android version 5.0 (lollipop) and above.
- iOS version 10.1 and above.
3. Getting started
- Download the Smartbooqing mobile app from App store, Play store.
Here is the shortcut: Click on App store or Play store, you will be navigated to respective stores. OR Mouse hover on QR code text–> Scan it –> You will be navigated to App store or Play store.
Andriod

iOS
- Once you have downloaded the app, click on app icon to open the app.
- If you are using the app for the first time, you will be navigated to the login screen.
4. Login

- Click here to login’ button, to navigate to login screen.
- Now enter your Smartbooqing registered email address and password.
- Click on login button and then you will navigate to set the pin screen.
5. PIN
- Set PIN & Confirm PIN:
- You can set a pin for your application which provides additional security and will always be asked when you open Smartbooqing application.
Note: This set pin will be only applicable for your device. If you install Smartbooqing app in another device and login with same account, then you need to set a new pin for that mobile device.
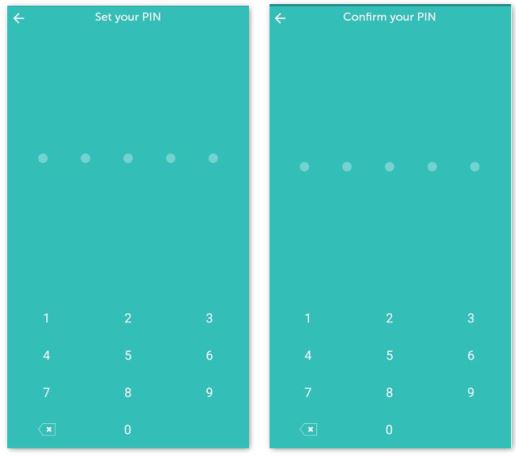
5.1 Set PIN
- Set a 5-digit PIN.
- You then need to confirm the same PIN again.
Note: Remember this PIN, as will always be required to log into the app.
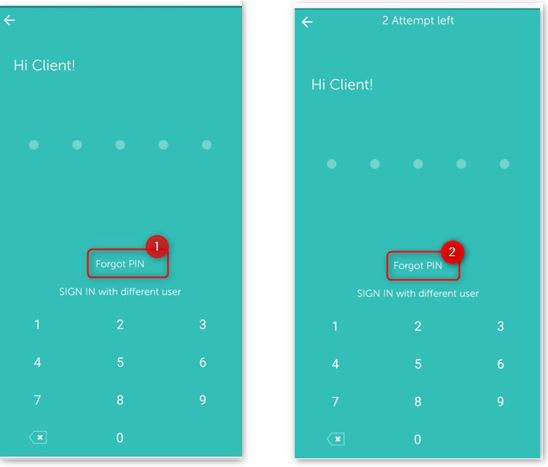
5.2. Forgot PIN
- If you forget the app PIN, then click on ‘forgot your PIN’. You will be redirected to login screen where you can set the new PIN.
- In case, if you enter a wrong PIN in three attempts, you will be redirected to login screen.
Note: If you enter wrong PIN 3 times your account will be locked.
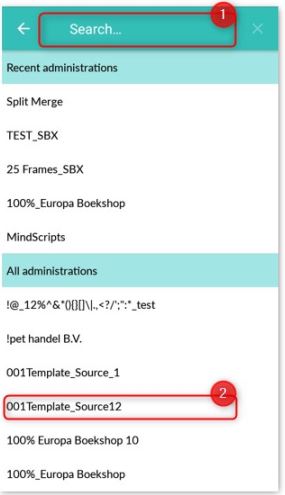
6. Administration list
- Once the pin is set, you need to select the administration for the first time.
- The last selected administration will always be pre-selected when you open the app for the next time.
- Search: You can search the administration using the search.
- Select administration: Select the administration for which you want to upload the documents.
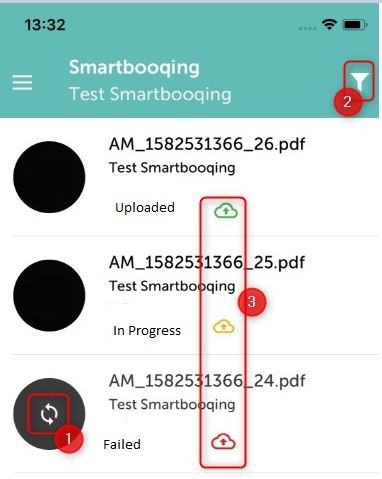
7. Home
- Once you select an administration you will be navigated to be home screen.
- As per the selected administration the documents will be listed.
- Retry: You can try to re-upload document in case they are failed to upload.
- Filter: Filter the document list view.
- Document upload status: View the upload status of document
7.1. Document upload status
- Select the administration from the administration list.
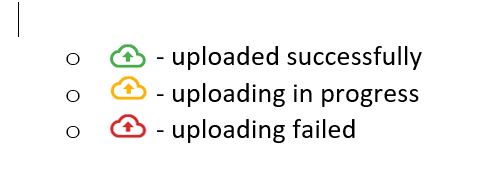
- You can check the status of the upload, by the following symbols
7.2 Filter
You can filter the documents by status.
Click on filter icon and select the option from filter menu. There are three types of filters available:
- All- All document including uploaded and failed will be listed.
- Uploaded- Only successfully uploaded documents will be listed.
- Failed uploads- Only failed to upload document will be listed
Note: The documents which are uploaded from portal/ email will not be displayed in mobile app.
8. Upload documents (Gallery / Camera)
You can click on the camera icon to upload documents. You will be navigated to the camera screen.
You can upload document in two ways as:
- Camera: Capture new images
- Gallery: Upload already captured images from gallery
8.1. Camera modes
You can capture several documents with multiple pages at once.
- Capture document: Click on camera icon to capture documents
- New document: If you want to capture new document, you can click on ‘New document’ icon and then capture a new document.
- Document set: If you want to continue capturing multiple pages of the same document then no need to click on new document option.
- Delete document: Click on minus icon to delete the complete document.
- Tick: Once you are done (completed) with capturing document you can click on ‘Tick’ icon to move ahead to upload.
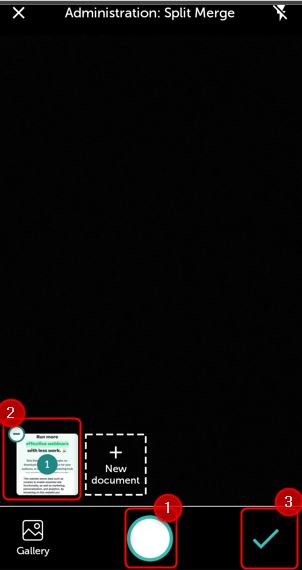
8.1.1. Steps to capture “One document with many pages”
- Click on camera icon to capture a document.
- The count of document will be displayed on the document set. Repeat step-1 until you finish capturing documents.
- Once you are done, you can click on tick icon to proceed ahead.
Note: The maximum limit is 10 pages of a document.
8.1.2. Steps to capture “Multiple documents of one page each”
- Click on camera icon to capture document.
- Now to capture new document, click on ‘New document’ and then click on camera icon to capture document. Repeat step-1 and step-2 to capture multiple documents.
- The count of document will be displayed on the document set.
- Once you are done, you can click on tick icon to proceed ahead.
Note: The maximum limit to upload 10 documents.
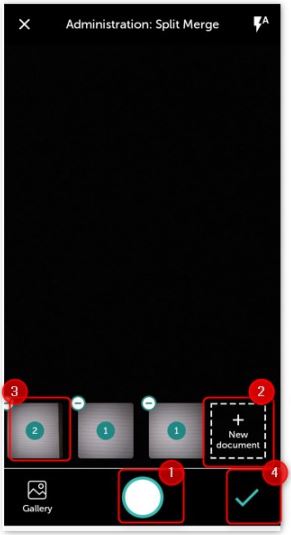
8.1.3 Steps to capture “Multiple documents with many pages”
- Click on camera icon to capture document. If you want to capture more pages in the same document, then keep capturing documents.
- Else to capture new document, click on ‘New document’ and then click on camera icon to capture document. Repeat step-1 and step-2 to capture multiple documents.
- Now you can see multiple document set with their page count.
- Once you are done, you can click on tick icon to proceed ahead.
Note: The maximum limit to upload 10 documents with 10 pages each. Also if you wish to modify any document you can perform modifications like delete/ retake/ rotate/ crop on review screen.

8.2 Gallery
- You can click on gallery icon and then navigate to gallery screen, where all your phone’s gallery folders/ files will be displayed.
- You can also select the images from your gallery by clicking on the Gallery icon.
- Tip: Select one image from gallery and upload at a time and then select new document option and again click on gallery to upload next image.

Note:
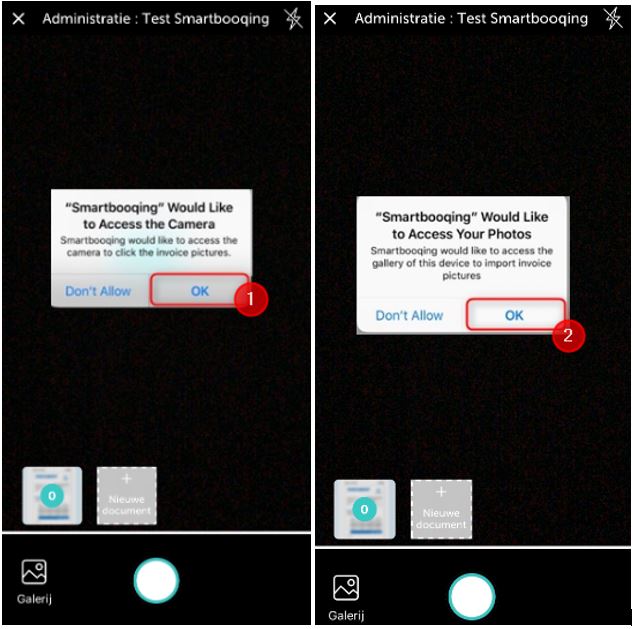
- To submit documents, you need to do give Smartbooqing app permission to access your photos, media files and camera. Please see the below steps.
- You need to click on OK(1) to allow access to camera
- You need to click on OK(2) to allow access to gallery.
9. Review captured document
You can review documents in grid view or list view.
Once you are done capturing document you click on ‘Tick’ icon and navigate on review screen.
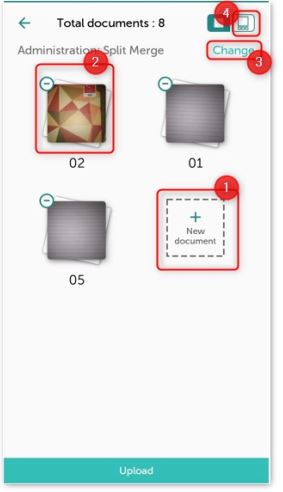
9.1. Grid view
Here you can view all of your captured documents and review them.
The documents will be displayed for review and the document page count.
- New document: Click here to capture new documents.
- Document details: Click on document to view all the details pages. You can view the documents details and perform actions as delete, crop, retake, rotate and can even change the sequence of pages.
- Change administration: Change administration before uploading your documents
- Switch to list view: Click on list icon to switch to list view
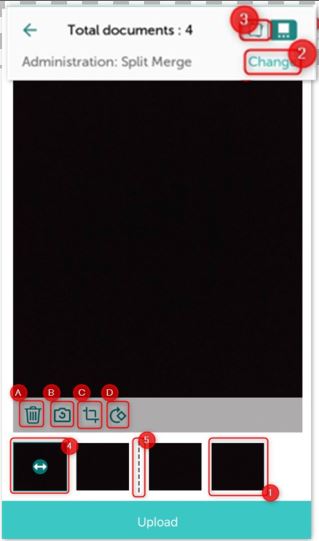
9.2 List view
Here you can view all of your captured documents and their respective pages for review.
- Select page: You can select a document page by clicking over it. You can now perform action as delete, retake, crop and rotate over the selected page.
- Delete
- Retake
- Crop
- Rotate
- Change administration: Change administration before uploading your documents
- Switch to grid view: Click on grid icon to switch to grid view
- Move pages: You can move page from one document to another. Long press (more than 3 sec) a page and then you can drag it to the respective document.
- Document divider: This symbol denotes the different between two documents.
10. Document detail page
You can select a document from the list to see the details.
You can view the details of the document by clicking on it.
- Document file name
- Uploaded administration
- Uploaded duration
- View next page: If you have multiple pages of a document, click or swipe to view next/ previous page.
- Document status:
- Upload successfully
- Failed to upload
- Full screen: Click on full screen icon to view the captured document in full screen.
- Retry: Click here to re upload document.

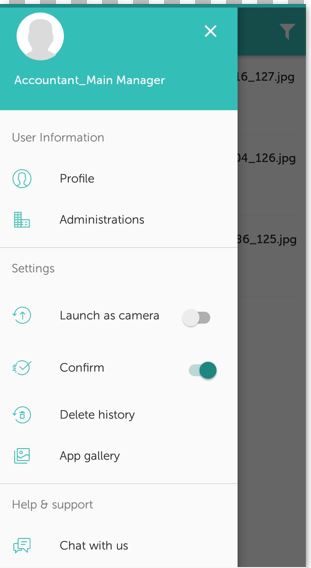
11.Menu
Click on menu icon to view the following option in the left navigation menu.
- Profile: Click here to view your profile details, change language, change PIN.
- Administration: Select administration to upload documents
- Launch as camera: If switch ON, camera screen will be displayed always when you open application.
- Confirm administration: If switched ON, confirm administration screen will appear before uploading documents.
- Delete history: Delete document history
- App gallery: View the images in app gallery
- Chat with us: Connect to Smartbooqing
- FAQ: View the FAQ section of Smartbooqing
- Quick tour: View the quick tour of how to use application
- Contact us: You can contact Smartbooqing for any query or email us at support@smartbooqing.com.
- Terms and conditions: View the Terms and Condition section of Smartbooqing
- Logout: To logout of application
11. 1 Profile
You can manage the below things:
![]()
- You can view all your profile details.
- Change language Select language option to change application language. Available language is as follows:
- English
- Dutch
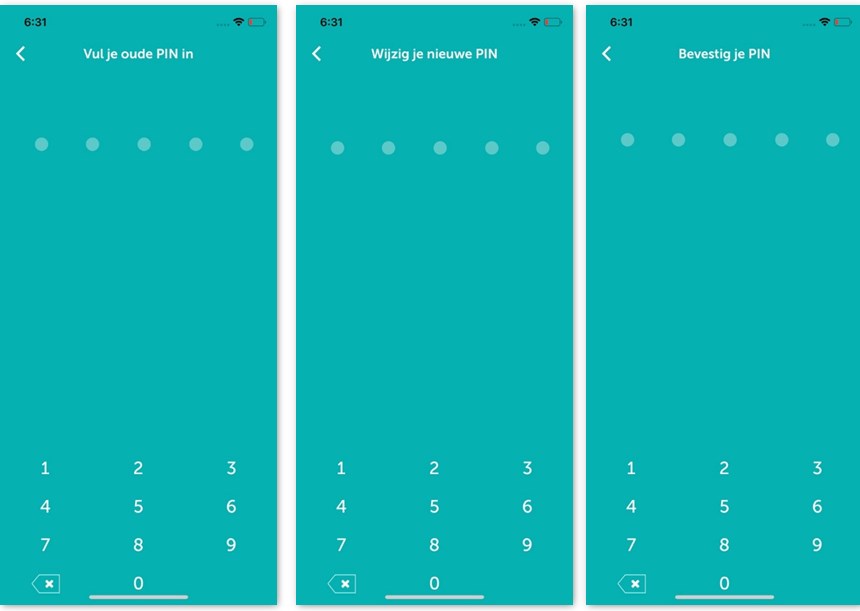
- Change PIN: You can change the PIN from profile setting. To change PIN you will need to follow the below steps:
-
- First enter your old PIN, the pin which you are using currently.
- Enter new PIN and Confirm PIN. The confirm PIN should be same as new PIN.
11.2 Confirm administration
- If you switch ON this option, then you be asked to confirm administration before uploading document. A pop-up will appear for confirmation
- Don’t ask again: If you select don’t ask option the confirm administration option will be disabled and will not ask you again to confirm administration before upload.
- You can enable it again from left menu.

11.3. Delete history
You will have two option while delete history as follows:
- Delete the entries from my phone: Successfully uploaded documents along with the document list and photos get deleted.
- Delete the media (images, pdf, etc.) from my phone: Only, photos of successfully uploaded documents get deleted from your mobile phone.
Note: When you delete, photos only get deleted from your phone, they do not get deleted from the Smartbooqing server. If you want to delete a wrongly uploaded file, immediately contact support@smartbooqing.com to get them deleted.

11.4 App gallery
- You can view all your captured images here.
- You can select on or multiple images and delete them accordingly.
