You find information about:
- How can I go to the contact list page?.
- Switching among the different views
- Settings explained- COC, dual contact, split column, discount settings, bulk edit etc
- Managing settings for contacts from different places like- ‘Review Page, Document details page.
- Adding a new contact
- How can I provide a Coc number to any contact and why giving Coc number is important
1. How can I go to the contact list page?
Once you’ve selected administration, go to contact list page; as shown below.
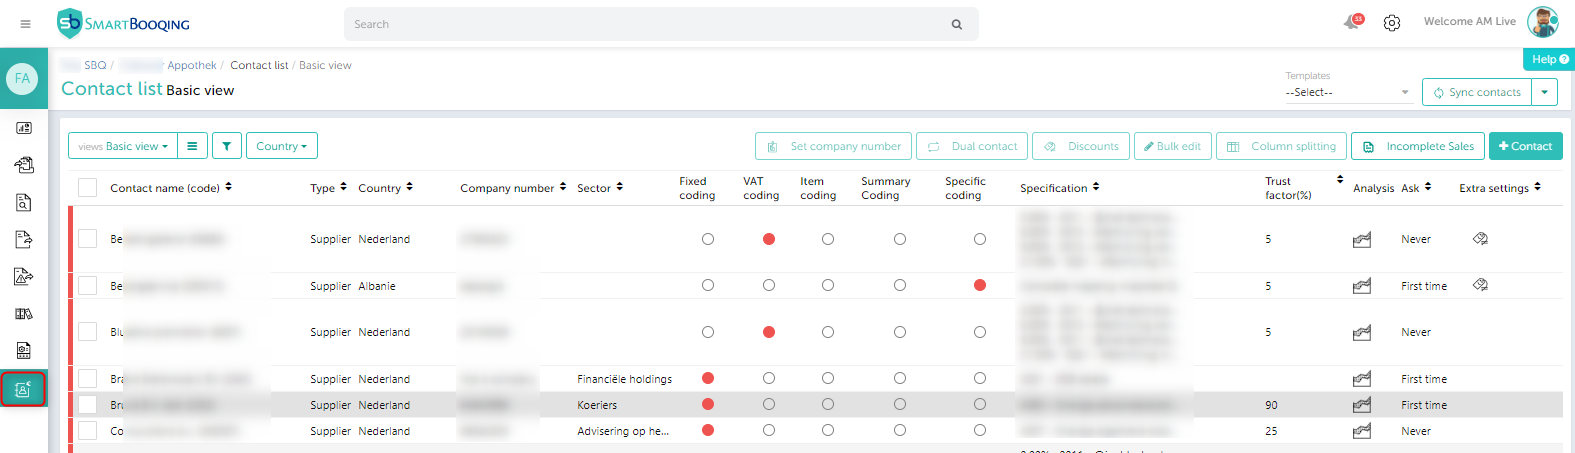
As you’re on the above page then you will be able to get the ‘Basic view’ of the contacts. In the above screen- ‘Basic view’ you can double click the line for any contact and go in the edit mode to change the settings.
2. Switching among the different views:
You can switch between the views to get the preferred view of the contact list as-
- Basic view
- Processing view
- Address view
- Bank view
- Apps view
As shown above you can change among st the views available.
Here on this page, you will be able to get the view for the settings applied for that particular contact by using icons in the column – ‘settings applied’.
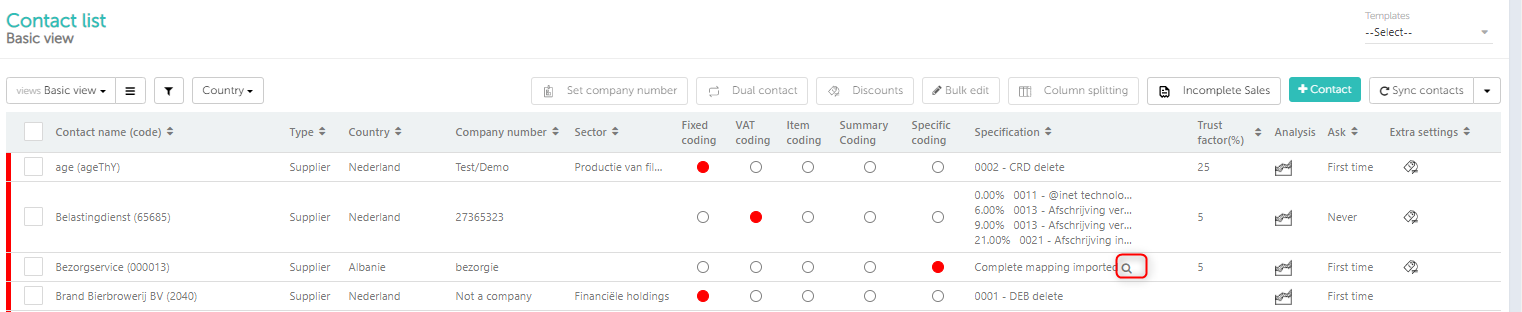
2. 1. Basic View:
- Here you see contact related basic information.
- Based on sources like accounting system, history and cloud intelligence, we suggest coding rule, and specification code(s).
- Also; indicate surety of contact in terms of ‘Trust factor(TF)’.
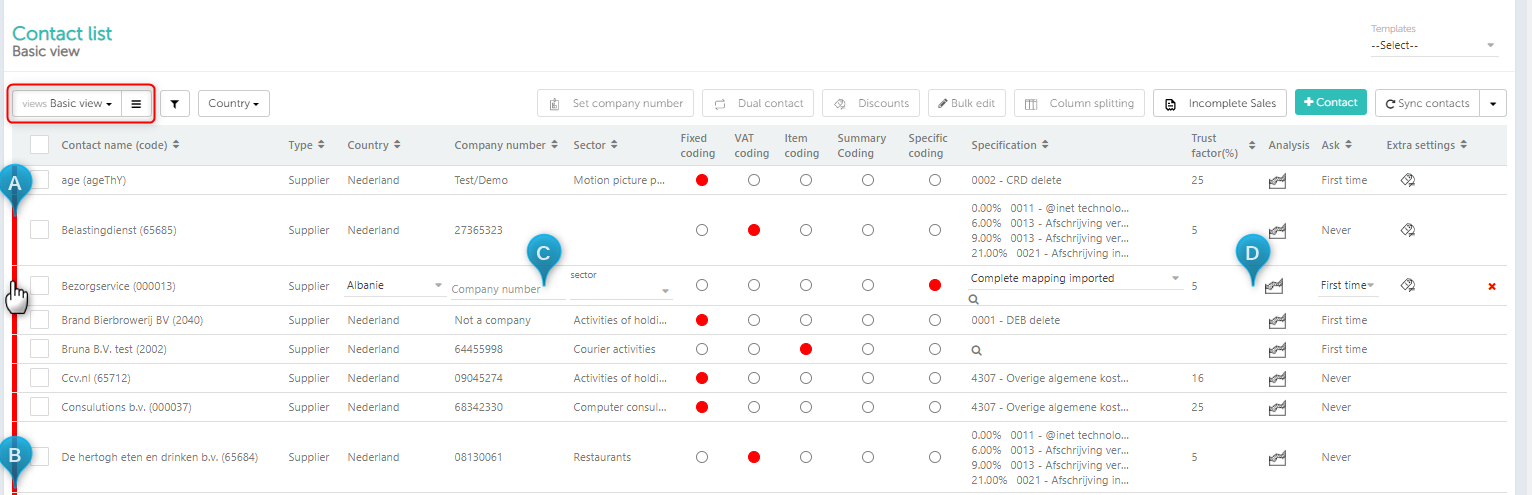
- Contacts which are not sure (lesser trust factor) will have red vertical line and red dot for coding rule and specifications. (A)
- You can confirm by clicking on red vertical line, or if you edit the contact; Contact will be confirmed automatically. (A)
- Confirmed contacts will have blank line and green dot for coding rule. (B)
- If no CoC for contact, system will highlight CoC field in red. (C)
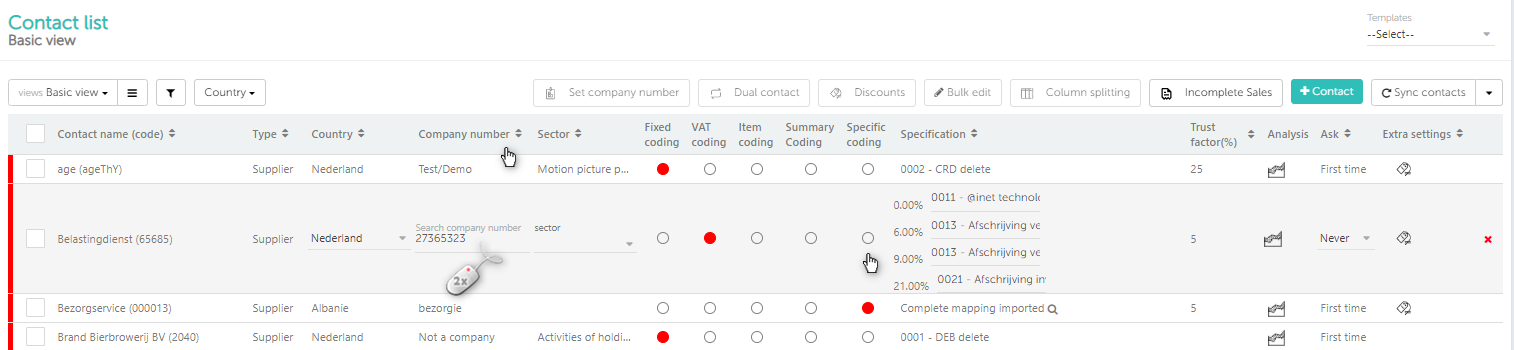
- Double click on contact line you want to edit
- You see CoC field; type the name you wish to search.
- You get suggestion, select from it.
- If no CoC? Select the checkbox and reason.

- Click on analysis icon you see suggestions from 3 sources and TF’s, as below:
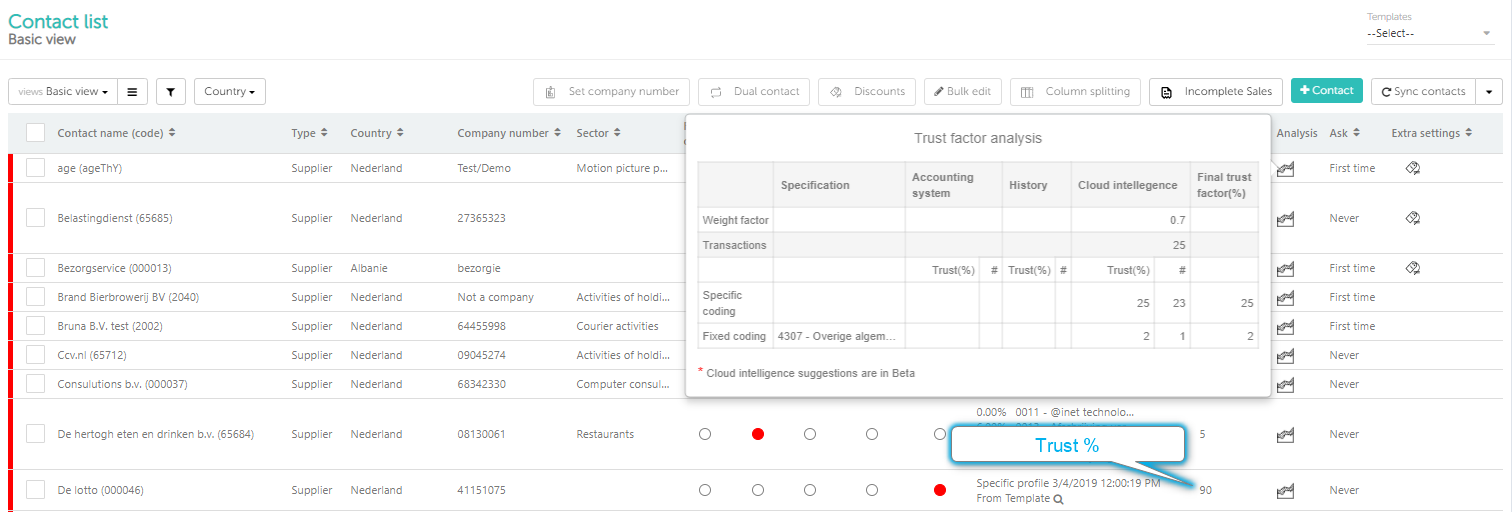
- On any of the line you can double click the contact line and go to the edit mode and choose the desired settings as shown below:
2.2. Processing view:

2.2.1. Coding rules available:
- Fixed Coding: All of the contacts can be processed on a fixed account code. Click here to learn more…
- VAT Coding : The account code is based on the vat percentage namely, 0%, 6% and 21%. Click here to learn more…
- Item Coding: The products define Account codes or articles, for each item there will be a different account code and invoice will be processed line- by- line. Click here to learn more…
- Specific Coding: Articles, which cannot be considered in generic product groups, are specific. For these kind of articles, we can have setting specific coding. Click here to learn more…
- Summary Coding: The invoices of these contacts are always having a summary either on the start or at the end of invoice page. Click here to learn more…
2.2.2. Specifications:
It can be different according to the coding rule, see the specification below with there respected coding rule.
| Coding rule | Specification |
| Fixed Coding | Fixed Account code |
| Vat coding | Different account codes based on VAT (0%,6%,21%) |
| Article coding | Article mapping (click on Magnifier to view) |
| Specific coding | Profile (click on Magnifier to view) |
| Summary coding | Profile (click on Magnifier to view) |
You can see a magnifier symbol from there you can select the desired on click.

2.2.3. VAT Rule
There are 4 types of vat rule, you can set specific vat rule to the relation.
Types of coding rule-
- 0%- Vat will be recorded as 0%.
- No VAT- VAT will not be recorded.
- Book as per document – Vat will be recorded as per document.
- VAT transfer- When services are considered to be supplied, the regulations covering the supply of services to private firms, reverse-charging vat relating to services.
For this vat codes of vat transfer setting will be applied.
2.2.4. Daybook
Daybooks are different according to the document type (Purchase/Sales/Cash).
2.2.5. Payment term
The following setting gets imported from accounting systems. The payment term is the condition/setting where the payment of supplier needs to be done in desired timeline.
2.2.6. Ask
(‘Always’ / ‘Firstime’/ ‘Never’) options are available, ‘Always’ / ‘Firstime’ these option creates alert for invoice when it comes to Review page.
2.2.7. Book always
Even the non –invoices, like reminder,order,overview etc. will be booked if this setting is ON for a relation. Click here to learn more…
2.2.8. Payment batch
The following setting gets imported from the accounting system, where in the “auto payment” gets set to the relation.
2.2.9. Payment type
Through which option auto payment will be done, this option can be set here. i.e. SEPA
2.2.10. Setting applied
If Relation has Advanced settings applied then in this column you can see icons. i.e. Korting = 
Note: All the above settings are synced from your accounting systems setting.
If any changes are made in Smartboqoing and are not available in your system then the settings made will disappear (undo). After sync with accounting system.
2.2.11. Cancel:
If you click on cancel, the changes made will be gone. It is more like the undo fuctionality.
2.3 Bank View:
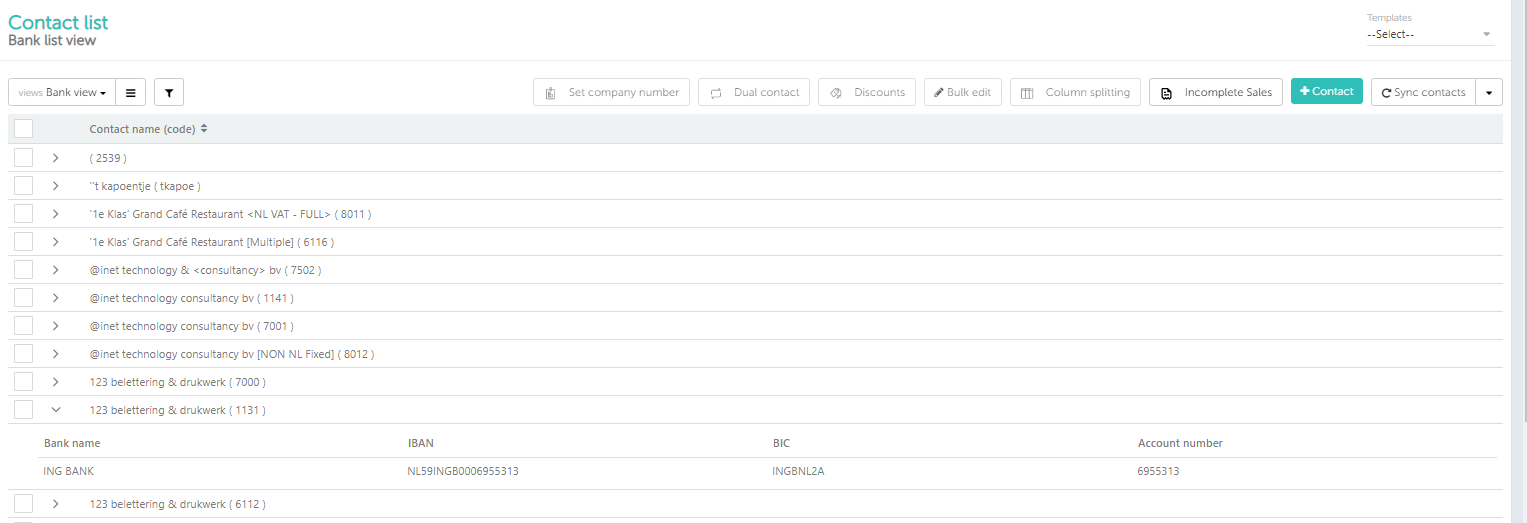
Bank name, IBAN, BIC code and account number can be viewed.
2.4 App View:
2.5 Address view:
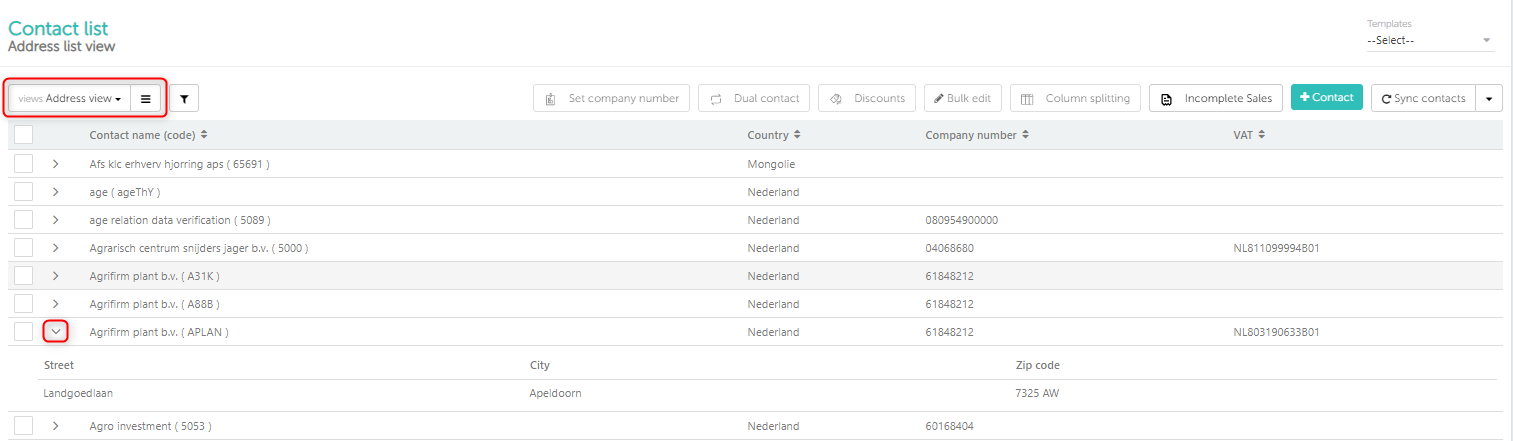
The address for the Relations can be seen from the drop down select th coding rule and in th next column select the specification.
3. Settings explained- COC, dual contact, split column, discount settings, bulk edit etc
What are the advanced settings I can do on this page?
By selecting the checkboxes in front of the contact you can do the advanced settings as shown below-

- Set CoC: Use this option to set the COC number for this contact. You can also set COC for multiple contacts at a time.
- Dual contact: This setting option enables you to change the type of the contact/invoice from sales to purchase or vice versa. While doing this you need to select an option and give the keyword(s). Click here to learn more…
- Discounts: This setting gives you options to set the rule for discounts, you can set a rule accordingly. There are three options- Click here to learn more…
- Percentage
- Fixed amount
- Discrepancy amount
- Column Splitting: For this setting, you need to contact or inform Smartbooqing support/helpdesk team, well in advance. In order to give you access to make column-splitting settings, our team will make the necessary settings at the backend and then you will be able to do the settings for column splitting. Click here to learn more…
- Settings applied: This column will show you the extra settings made for this contact, like cost code, partner code, etc…, these extra processing settings will be displayed in the form of Icons.
4. Managing settings for contacts from different places like- ‘Review page’, Document details page.
4.1. Contact list
- On this page you can click on the any row (double click) and the line itself go in the edit mode. With this you can change the settings as shown below-

4.2. Document details page-
Click on edit contact, and you can edit the contact details.

4. 3. Review tab

You can also change the contact settings from ‘Review page’) open the document with comment by expanding it and there you can make the changes as shown below.
Note: Only for new relations this can be edited from ‘Review’ page
5.Adding a new contact
At any point of time, if you want to add a new contact to the contact list, you can click on the ‘+Contact’ button to add the new contact as shown below-

Once you click on the, ‘+Contact’ button then you will be required to fill up few of the details as shown below-
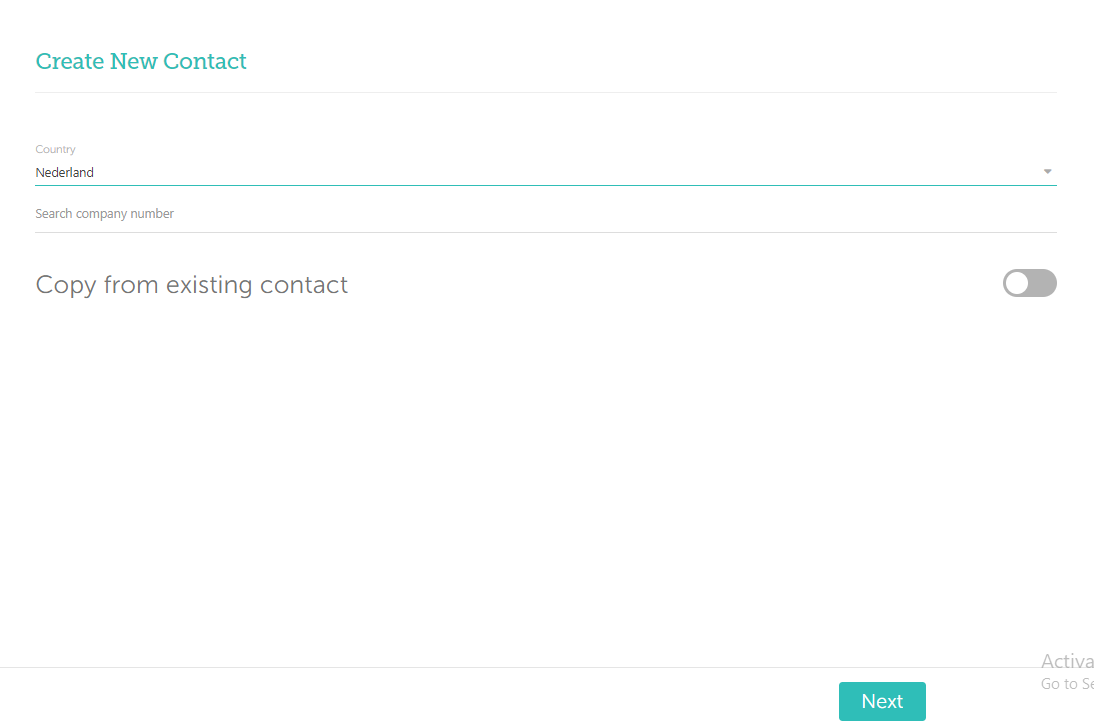
While creating a new contact user will be having 2 options-
- You can search the company by using ‘COC’ .
- Giving the COC (Chamber of Commerce) number is important as it be unique and help the system to maintain the record uniquely.
- If user is not having the COC for the company then user is supposed to give the reason for not having the COC and proceed.
- Also you can copy the contact by turning the toggle button ON and choose the contact from existing list (while copying the contact the type will be changed i.e if newly added contact is considered as supplier if existing is customer and vice versa)
From the above screen, when user selects the Next button then below screen will be there to fill some of the details and make the required settings.
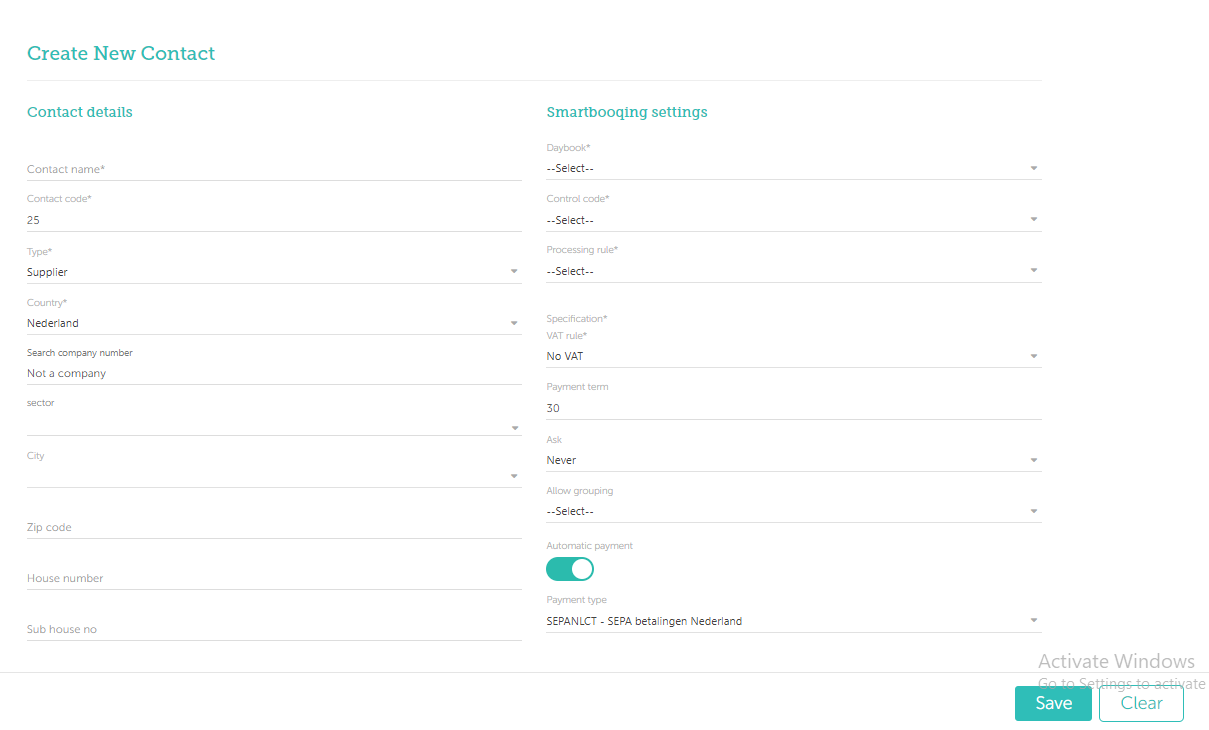
From the above screen, user can make the desired settings by selecting it from the dropdown or entering the data manually and click Next.
With this that particular contact will be added to the contact list.
6. How can I provide a Coc number to any contact and why giving Coc number is important
From the contact list page, if there is no Coc then you can click on the Coc option as shown in the below picture-

By double click you will get a magnifier icon in it and you can give the COC number or a reason for not having the COC number.
Benefits:
- By assigning a COC number we can enrich the data and contacts having COC will be easily found in the system for faster and better processing.
- By giving the COC to any of the contact, system can get the type of its sector/subsector which helps us to provide/suggest the better processing settings in future.
- Also with COC and its sector other contacts from same sector will be suggested with better and similar processing settings.