In this article, you will find information about:
- Spread (Book over period) setting.
- Where are the Spread setting available?
- Spread for Twinfield.
- Spread for Exact online.
- Spread for AFAS.
- Spread for Wunderbricks.
- Limitations.
1.Book over Period
‘Book over period’ is a concept where you can split the amount between desired periods.
This setting will help you with advance payments and installments of your bills. This setting is termed as ‘Spread’ in Smartbooqing.
You can Spread (Split) the amount in two ways:
- Invoice total amount (excluding VAT).
- Invoice individual lines (excluding VAT).
2.Where is the Spread setting available?
Spread settings can be applied from the following pages-
- The Review Page.
- The Invoice detail page.
3.Spread for Twinfield –
3.1 – Review page
Review Page-> Select document -> Spread button.
1. Select one invoice of type purchase or sales.
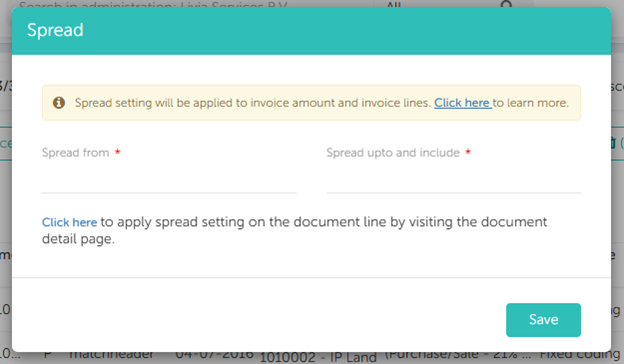
2. Click on spread button, to open spread settings.
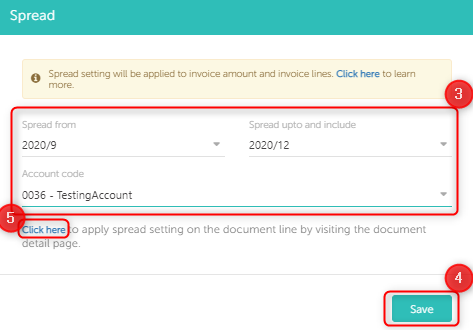
3. Now, set spread period on invoice amount with account code. You can set the start and end period.
4. Click on save button, to apply spread on invoice amount (excluding VAT). This spread period will also be applied to all invoice lines.
5. You can even set spread setting on invoice lines individually, by the visiting invoice detail page.
6. The spread icon will be displayed for that particular invoice on Review page.
3.2 Invoice Detail page
You can even apply the Spread setting from the Invoice detail page, on invoice amount as well as invoice lines, individually.
- Enable spread settings by clicking on the check box for Spread.
- Set spread period with account code for invoice amount. This will be applied to all invoice lines too.
- Else you can even set spread period for invoice lines, individually. Here, the invoice period will be considered as spread settings for invoice amount.
Note: You cannot remove spread settings for individual invoice lines for Twinfield.
3.3 Settings in Twinfield.
While booking,
- Go to → menu ‘Purchase’ → Data Entry → Fill invoice details → Click on ‘Spread invoice’ (top-right) → Select the “from-to” period → Select account code for spread booking → Click ‘Provisional’.
- You can even search for the invoice which is exported from Smartbooqing.
- In Search tab top of Twinfield window → Type ‘Spread Specification’ (shortcut to go to see report)
- Fill period (last of given period) → click on ‘Provisional transactions’ → press ‘Next’
- You can see the entry there but not the splits.
- The splits can only be seen after booking is made final. Go to → Menu ‘Financial professionals’ → Transaction lines → Select Creditors → Edit transaction → Mark ‘Final’
- Here, you can see the split booking.
- If this period is blocked, then it will restrict the booking for the invoice.
4. Spread for Exact online
4.1 Review page
Review Page-> Select document -> Spread button
1.Select one invoice of type purchase or sales.
2. Click on spread button, to open spread settings.
3. Now, set spread period on invoice amount with account code. You can set the “spread from” and “spread up to and include” period.
4. Click on save button, to apply spread on invoice amount (excluding VAT). The Spread period will also be applied to all invoice lines.
5. You can even set spread setting on invoice lines, individually by visiting the invoice detail page.
6. This spread icon will be displayed for that particular invoice on Review page.
4.2 Invoice Detail page
You can even apply Spread setting from the Invoice detail page on invoice amount as well as all invoice lines.
1. Enable spread settings.
2. Set spread period for invoice amount. This will be applied to all invoice lines.
3. You can even set different spread period for all invoice lines, individually.
4. You can even remove a spread period for a particular invoice line by clicking on the spread symbol next to the invoice line.
4.3 Setting in Exact Online
Setting
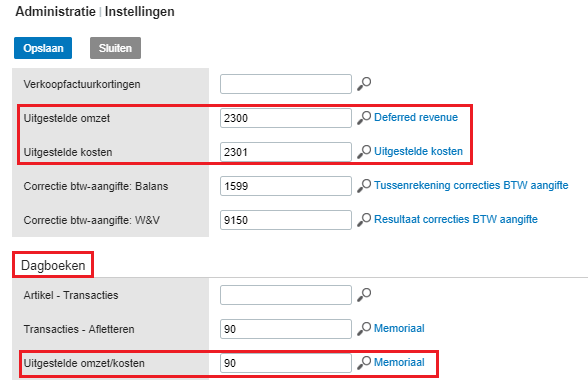
- Select company from top-left → Select ‘Setting’ → Assign account code to Deferred Revenue and Deferred Cost → Select journal for Deferred cost/Revenue.
While booking
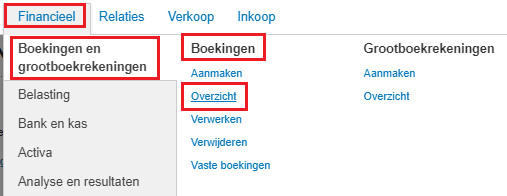
- Go to → Menu ‘Financial’ → Entries & G/L Accounts → Entries → Create → Select purchase daybook.
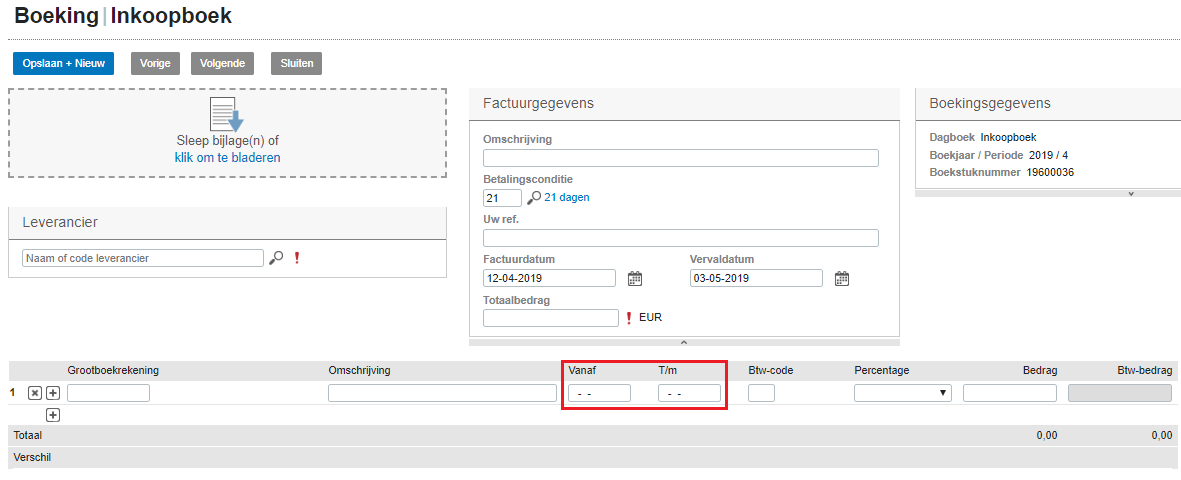
- On this page, the deferred cost fields are mostly hidden, to view them do this –
- Go to → Top-right of page → Click on the Setting icon → Select Customize → Select ‘Deferred cost’ ON → Press Save.
- You can now see a “from-to” option on the invoice line.
- After saving the booking, you can see deferred cost split booking in journal 90 (selected above).
- Go to → Financial → Entries & G/L Accounts → Entries → Overview → Click on entry count in front of daybook 90.
- Click on entry you want see → then you can see split whole line once.
- If you want to split in equal in each period, do following setting.
- Go to → Select company form top-left → Select ‘Settings’ → Financial → Bank/Cash entries: Split → Select ‘Automatically split invoice payments per invoice’ → Press ‘Save’
- You can see the split for next booking.
- For old bookings edit and save with periods.
Limitation
- You cannot see split line while booking.
5.Spread for AFAS
5.1 From the Review page
Review Page-> Select document -> Spread button
1. Select one invoice of type purchase or sales.
2. Click on spread button, to open spread settings.
3. Now, set spread period on invoice amount with account code. You can set the start and end period.
4. Click on save button, to apply spread on invoice amount (excluding VAT). This spread period will also be applied to all invoice lines.
5. You can even set spread setting on invoice lines individually, by visiting invoice detail page.
6. This spread icon will be displayed for that particular invoice on Review page.
5.2 From the Invoice Detail page
You can even apply Spread setting from Invoice details page on invoice amount as well as all invoice lines.
1. Enable spread settings.
2. Set spread period for invoice amount. This will be applied to all invoice lines.
3. You can even set different spread period for all invoice lines, individually.
4. You can even remove a spread period for a particular invoice line by clicking on that particular line and completely removing the date.
5.3 Setting in AFAS
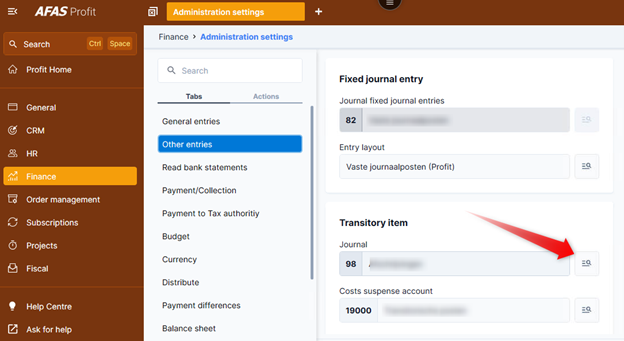
Go to Finance -> Management -> Administration Settings
(You can also just search for “Administration Settings”)
Next, Go to Other entries -> Select the appropriate Journal under Transitory item.
This setting is mandatory to prevent invoices from getting stuck on the export error page.
6. Spread for Wunderbricks
6.1 From the Review Page
Navigation: Review Page → Select Document → Spread Button
-
Select a single invoice of type Purchase or Sales.
-
Click the Spread button to open the spread settings.
-
Set the spread period by choosing the start and end dates.
-
Click Save to apply the spread to the invoice. This spread period will also apply to all invoice lines.
-
To set spread settings for individual invoice lines, visit the Invoice Detail page.
-
Once applied, a spread icon will appear next to the invoice on the Review page.
6.2 From the Invoice Detail page
You can also apply spread settings directly to individual invoice lines on the Invoice Detail page.
-
Enable spread settings by checking the Spread checkbox.
-
Set the spread period for the invoice amount. This setting will apply to all invoice lines by default.
-
Alternatively, you can customize the spread period for each invoice line individually.
7. Limitations
-
If spread settings are activated on invoice lines, then the group booking feature will no longer work. The only exception to this is in the case of Wunderbricks, where all invoice lines will still be grouped, but under the spread period of the first invoice line.
-
On the Review page, spread settings can only be applied to one invoice at a time. It’s not possible to select multiple invoices and apply spread settings in bulk.
-
Spread settings also cannot be applied to miscellaneous or non-bookable invoices.
-
Currently, the spread feature is available for the following accounting systems: Twinfield, AFAS, Wunderbricks and Exact Online.
-
For Twinfield specifically, once a spread setting has been applied to an invoice line, it cannot be removed.
-
In the case of Wunderbricks, spread settings are mandatory. If the spread checkbox isn’t selected or the spread periods haven’t been defined, the system will automatically use the document date of the invoice as both the start and end period.


