- Set up authorisation
- Getting started
- Log in
- Icons Explained
- Dashboard
- Authorise/Confirm action
- Authorisation
- Confirmation
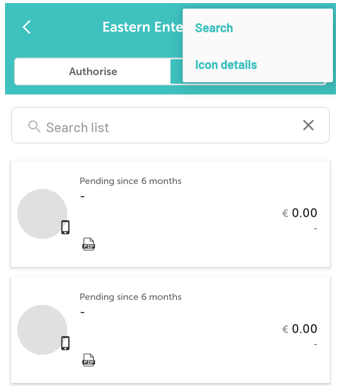
- Search all overviews
- History
- Profile
- Chat
- Menu
Introduction
- The authorisation app ‘Smart OK’ helps users to authorise and confirm the documents quickly and easily. This transparent processing ensures that you always have a grip on your business process.
- The authorization module has 2 steps that work independently of each other. By default, “confirm” is on. In addition, in “Authorization” you can assign documents to the right people with smart workflows.
1. Set up authorisation
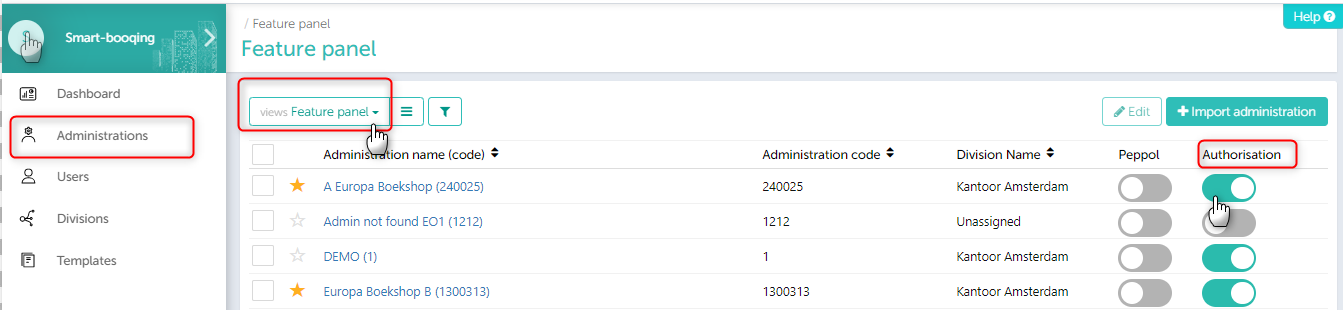
A. Activation authorisation at administration level: Enable authorisation
- Click on administrations in the left-hand menu.
- Select “view functions”
- Switch on the authorisation module for the relevant administration (s). More info…
- Organization level-> Administrations-> View- Functions->authorisation module
B. User roles and rights:
Administration level-> authorisation module -> User roles
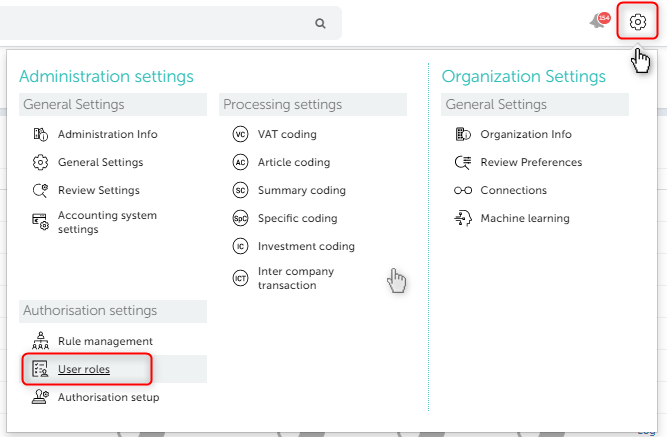
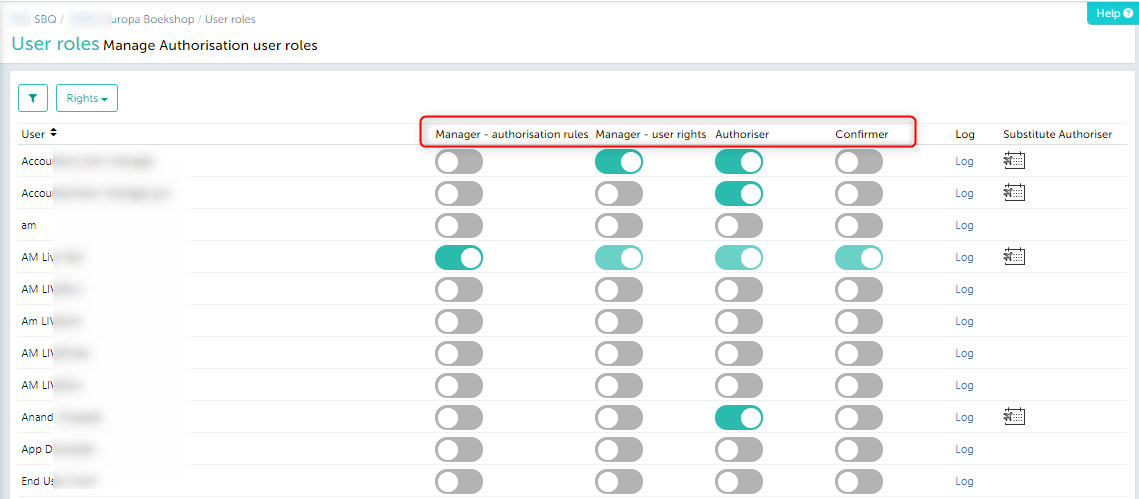
The rights for the authorisation module must be granted by the administrator. More info…
| User roles
|
Rights | |||
| Authorise documents | Confirm documents | Manage users | Manage authorisation rules | |
| Manager- authorisation rules | Yes | Yes | Yes | Yes |
| Manager- user rights | No | No | Yes | No |
| Authoriser | Yes | No | No | No |
| Confirmer | No | Yes | No | No |
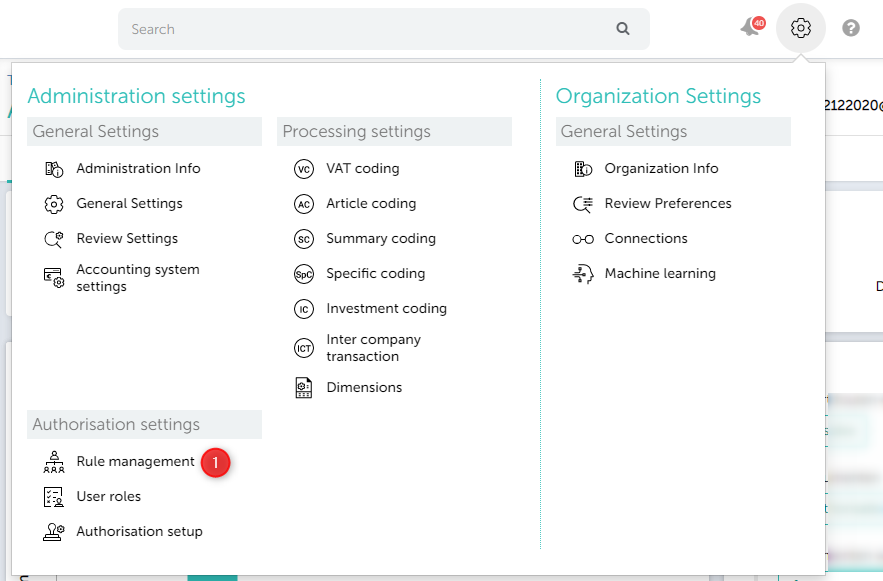
C. Setting rules:
The authorisation and Bypass rules, can only be set via the Smartbooqing portal. More info…
Administration level->authorisation module) -> Rule management.
2. Getting started
- Search Google Play / App Store for the “Smart OK” application.
Android: https://play.google.com/store/apps/details?id=com.smartbooqing.smartok
iOS: https://apps.apple.com/app/smart-ok/id1466950203?ls=1 - QR code: Scan the QR code with your smartphone and download the app.
Android QR:

iOS QR:

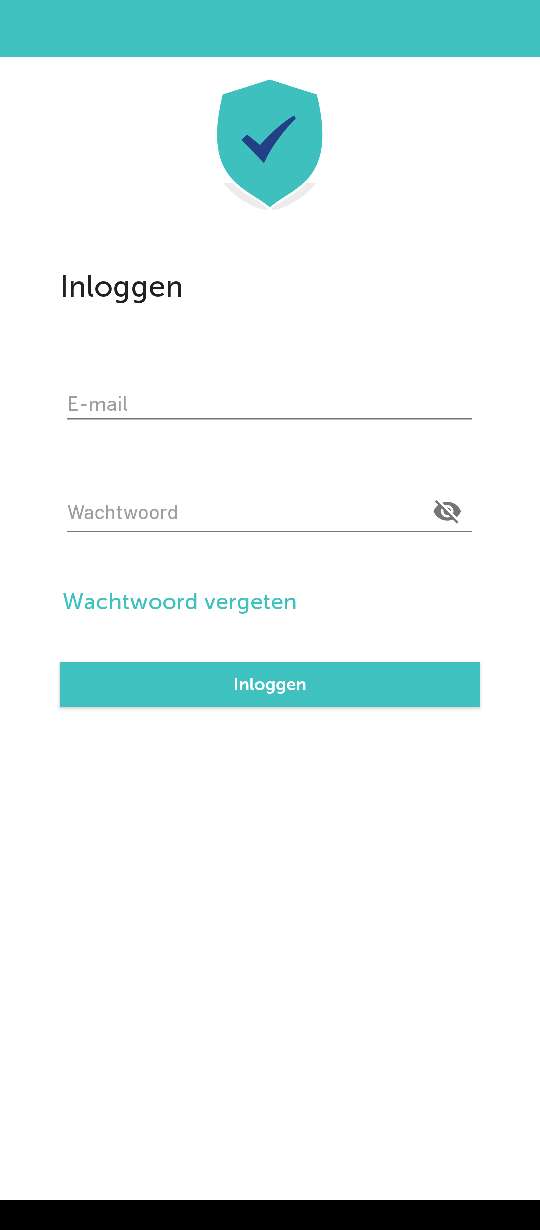
3. Log in
Smartbooqing login details: Enter the current Smartbooqing login details (email address and password). If there are problems logging in, send an email to support@smartbooqing.com
3.1. Forgot Password
Enter email id and click on forgot password link.

3.2. PIN
A. Access with PIN code
- Enter the 5-digit number that is set in the portal.
- You will need this code every time you log in to the app.

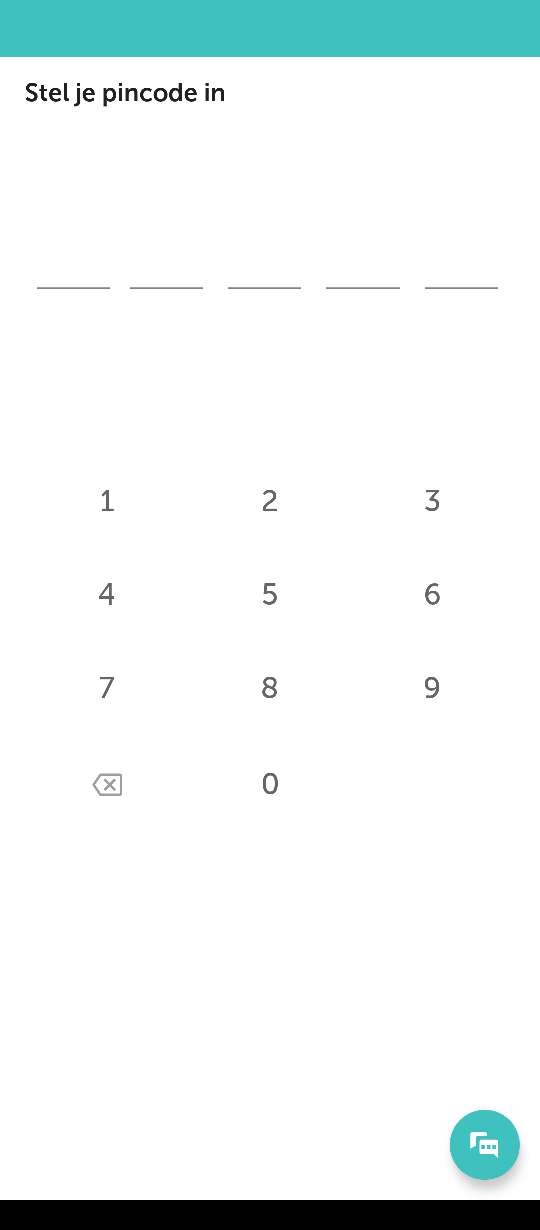
B. Set PIN code
- No pin code set via the Smartbooqing portal or via the basic app? To continue, you must first set this PIN code.
- Setting your pin code: Choose a 5-digit number, which you need with the app every time you log in.
Tips:
PIN code cannot contain the same digits. 44554
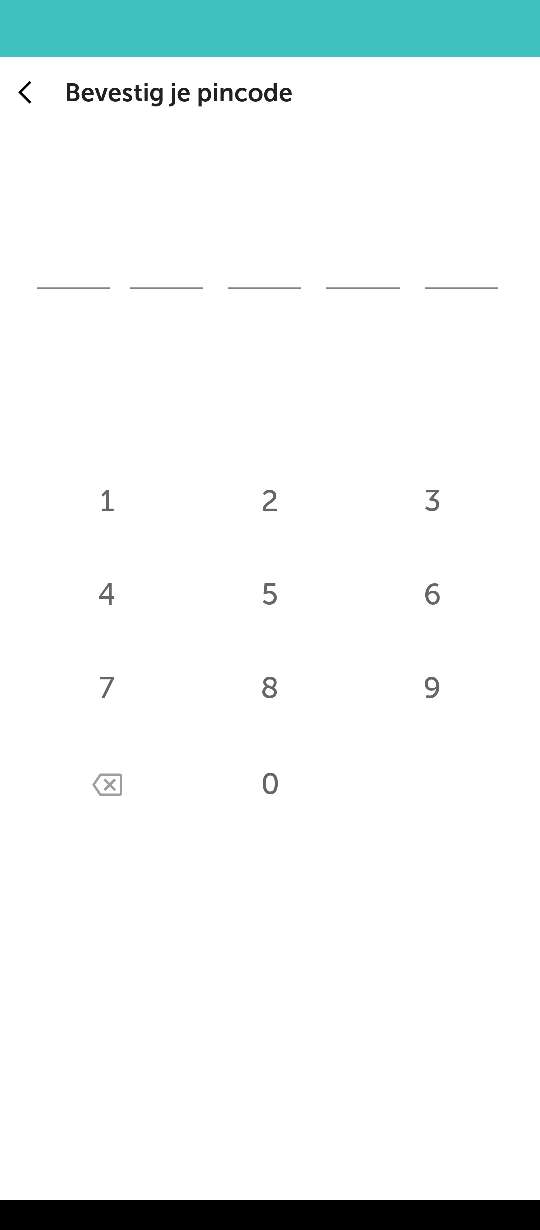
C. Confirm your pin code
- Enter the same pin code again for confirmation.
- The PIN code will be set after confirmation and you will be directed to the Dashboard.
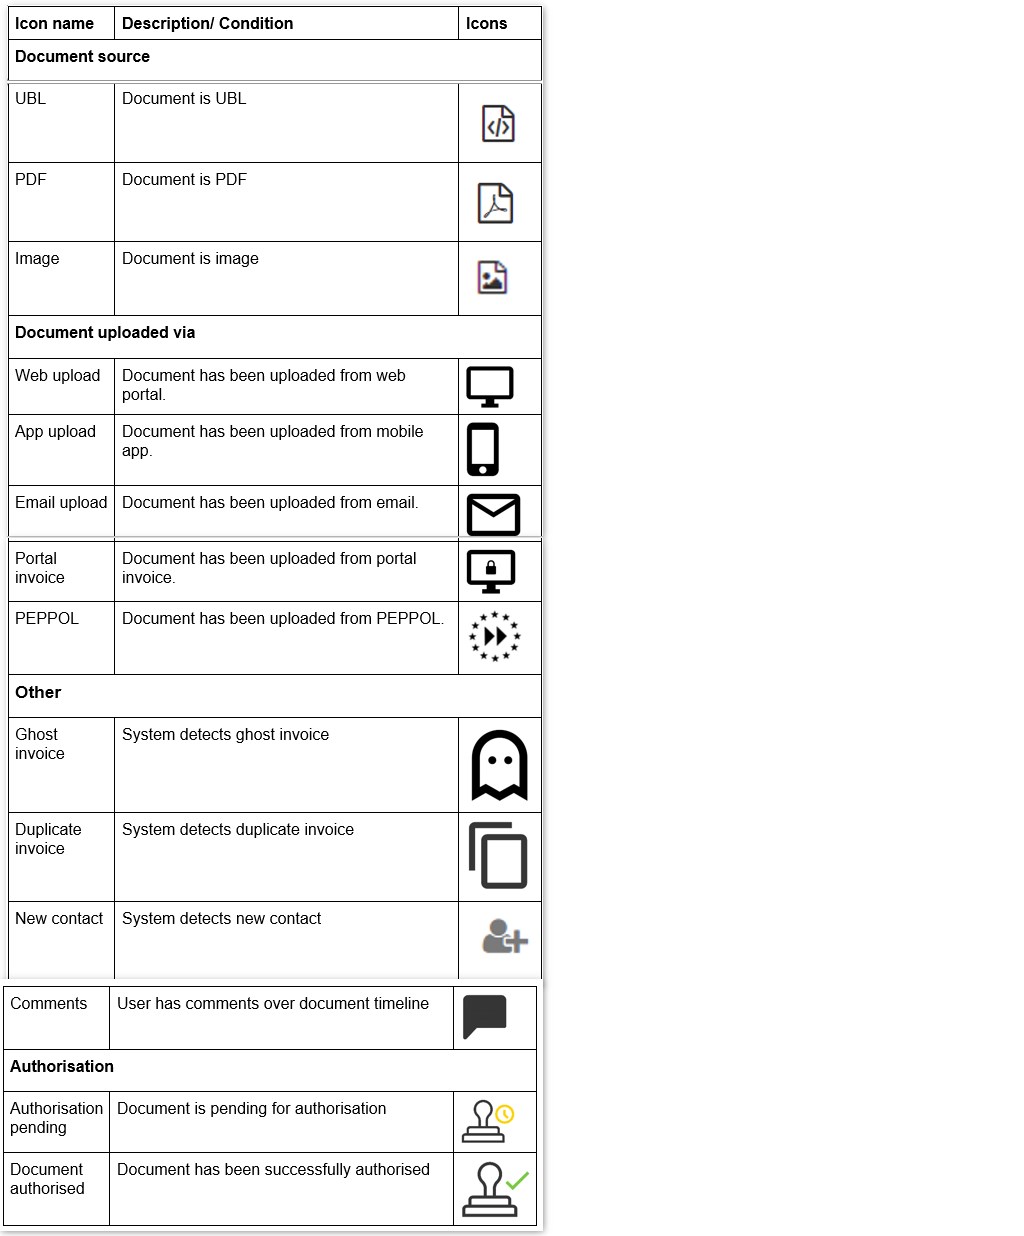
4. Icons Explained
5. Dashboard
Overview about all your pending document for authorisation and confirmation for each administration.

- Authorise Docs: Total number of documents from all administrations which are pending for authorisation.
- Docs to confirm: Total number of documents from all administrations which are pending for confirmation.
- Administration name: Name of the administration.
- To be authorised: Documents pending for authorisation for the respective administration.
- To be confirmed: Documents that are pending for confirmation for the respective administration.
- Swipe right to view data for other administrations.
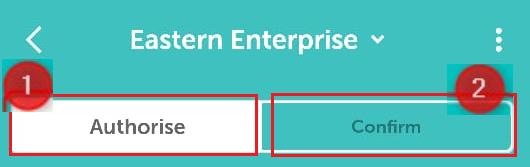
6. The Authorise / Confirm options action
A. Administration list
- You can change administration by clicking on the “administration name”.
- The documents will only be displayed for selected administration.

- Information symbol (i)
- Click on (i) symbol
- View the description of all icons

B. Authorise / Confirm field
Respective documents are displayed for the selected administration. If the user is an authoriser or confirmer, the respective section will be shown to this user.
- Authorise: All documents which are pending for authorisation are shown in this section.
- Confirm: All documents which are pending for confirmation are shown in this section.
7. Authorisation
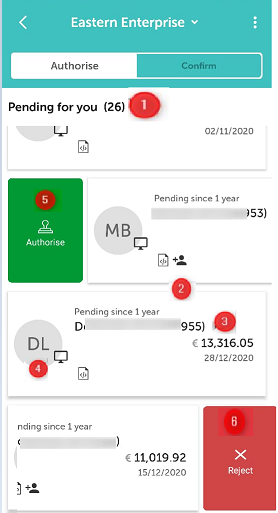
A. Authorisation list overview (authorise / reject)
All documents that are pending for authorisation for the selected administration are displayed.
- Pending for you: The total number of documents that are pending for authorisation.
- Pending since: The number of days since that document is pending for authorisation.
- Name: Name of relation from which the document was received.
- Document source: From which source the document is uploaded.
- Reject action: Swipe from right to left to reject the document.
- Authorise action: Swipe from left to right to authorise the document.
- More option:
-
- Icon description: View description of icons
- Search: You can search a document based on contact name and code
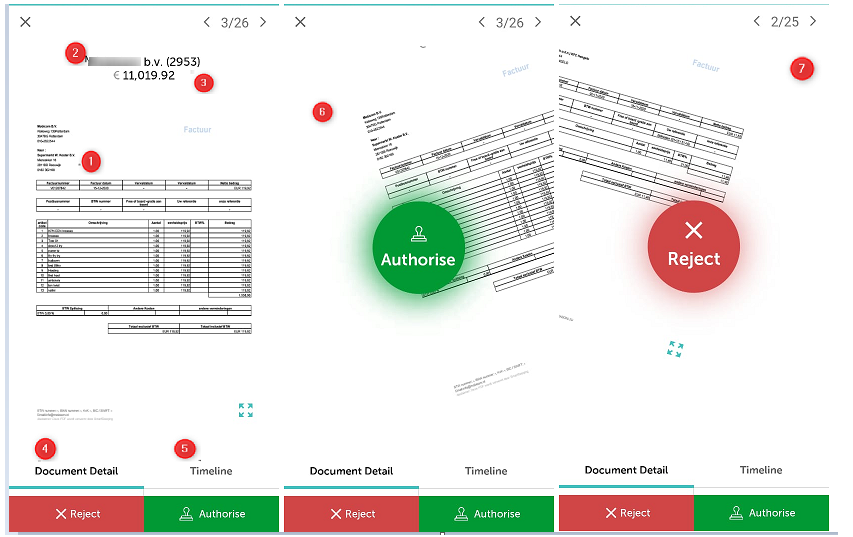
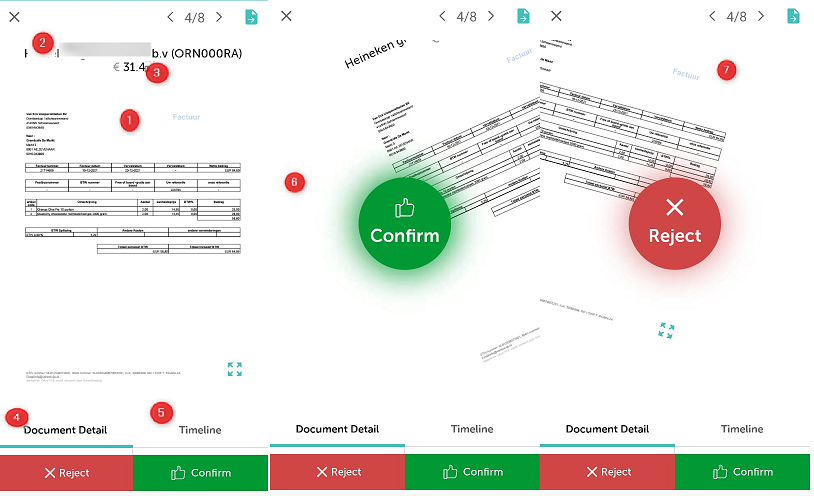
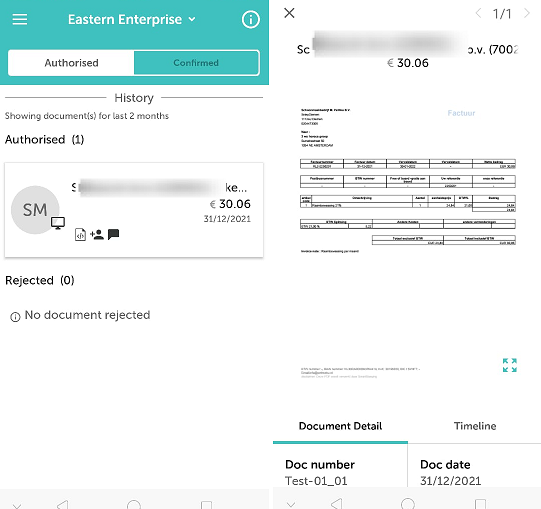
B. Authorisation Document Detail Page (authorise / reject)
Click on a document and you will be directed to the document detail page. There you will find all document data such as:
- Invoice
- Relation name
- Amount
- Pagination with Previous and Next button so you can traverse easily between documents.
- Document details: Document details are displayed.
- Timeline: All actions performed over the document are displayed.
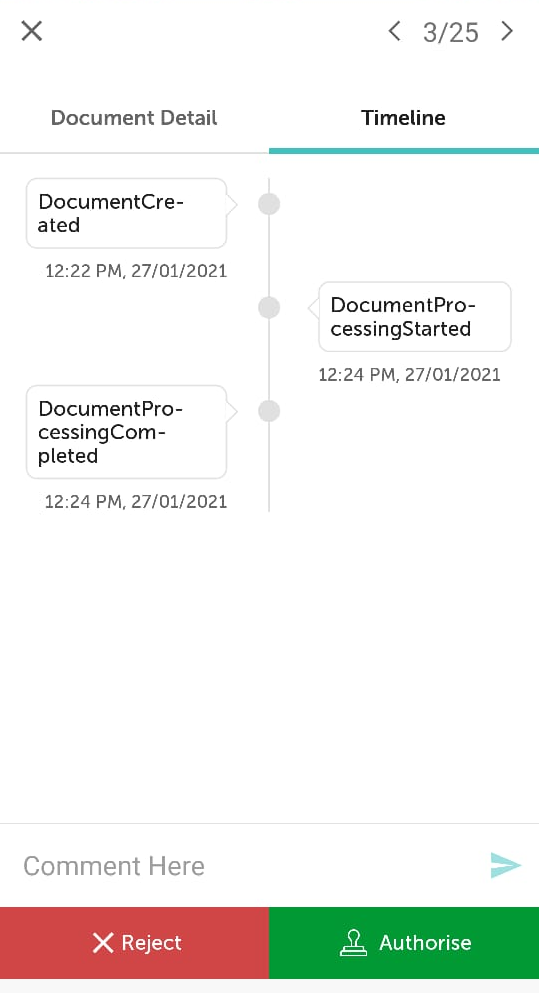
- Authorise: Click on “authorise” or swipe from left to right to authorise the document.
- Reject: Click on “Reject” or swipe from left to right to reject the document.
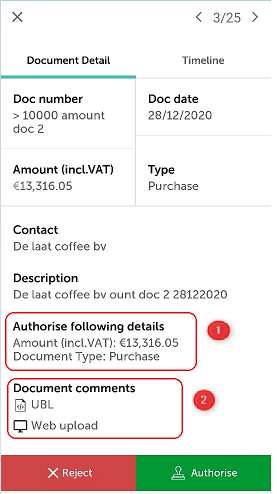
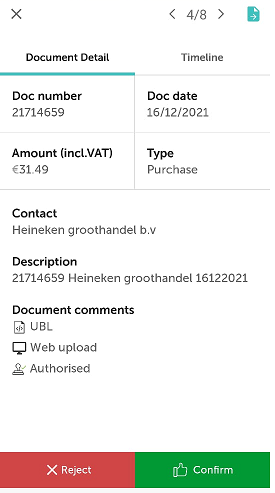
C. Document details
Documents details are displayed in this section
- Authorise details: The rule criterion will be displayed in this section.
- Document comments: Various icons will be displayed based on document source, document properties and any other action take over document.
D. Timeline
All actions performed for the document are displayed. You can also add a comment to the timeline.
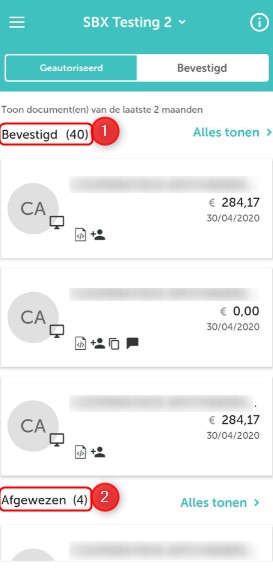
8. Confirmation
A. Confirm overview (authorise / reject)
All documents that are pending for confirmation for the selected administration are displayed.
- Pending for you: The total number of documents that are pending for confirmation.
- Open since: The number of days the document is pending for confirmation.
- Name:Name of relation from which the document was received.
- Document source: From which source the document is uploaded.
- Authorise action: Swipe from left to right to confirm the document.
- Reject action: Swipe from right to left to reject the document.
- More option:
- Icon description: View description of icons
- Search: You can search a document based on contact name and code

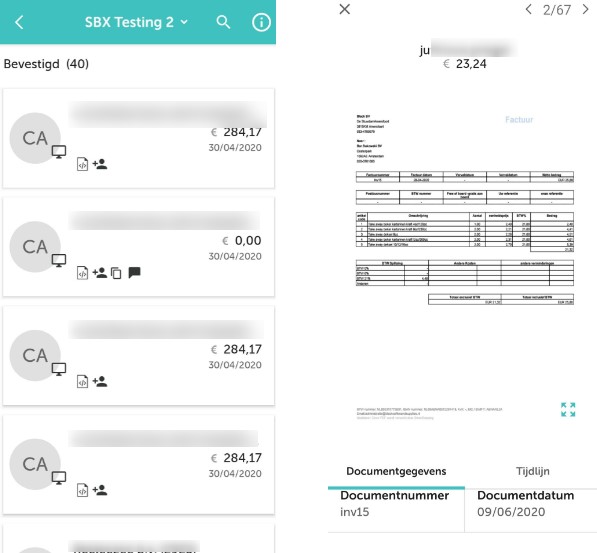
B. Confirmation Document Detail Page (confirm/ reject)
Click on a document and you will be directed to the document detail page. There you will find all document data such as:
- Invoice
- Relation name
- Amount
- Document details: Documents details are displayed.
- Timeline: All actions performed over the document are displayed.
- Confirm: Click on “confirm” or swipe from left to right to confirm the document.
- Reject: Click on “Reject” or swipe from right to left to reject the document.
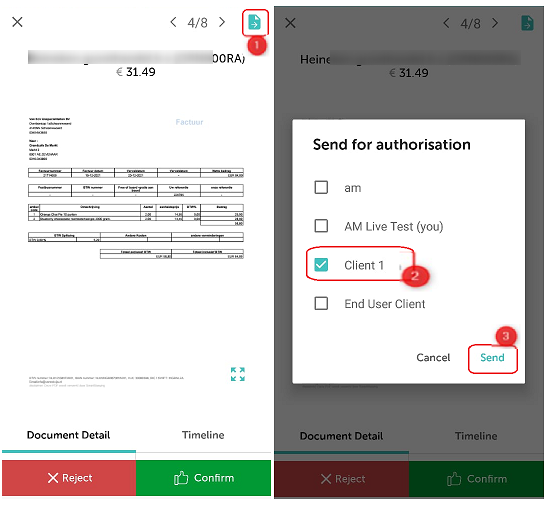
- Send for Re-authorisation: User can now sent documents for re-authorisation. It will click on re-authorisation icon and then set the name of authoriser to whom he want to sent document for re-authorisation
C. Send for Re-authorisation
- User will click on Re-authorisation icon.
- Select authorise to whom he wishes to send for re-authorisation.
- Click on send button
D. Document details
All invoice information is displayed.
E. Timeline
All actions performed from the document are displayed. You can also add a comment to the timeline.

9. Search all overviews
- The search icon is available where you can search for a specific file. Click on the search field, type the keyword and press enter.
10. History
- You can click on History section and view the invoice on which user has already taken action as Authorised, Confirmed and Rejected.
- In History section there will be 2 tabs similar to pending section as follows:
- Authorised
- Confirmed
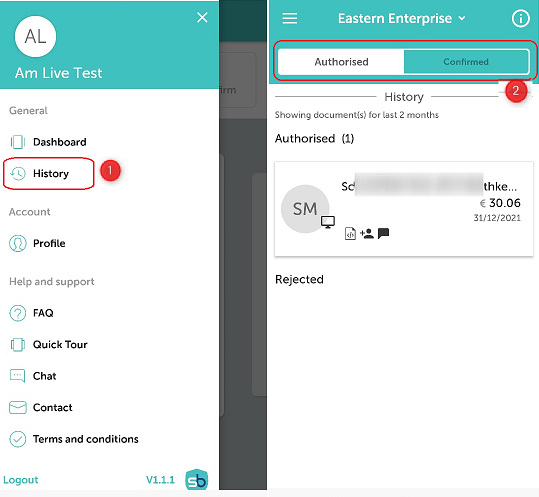
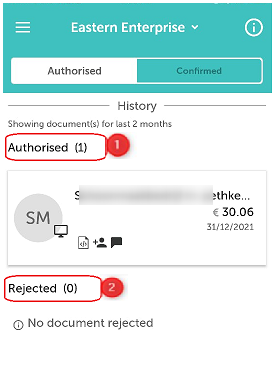
A. Authorised:
- Authorised history section are divided into two sub-section as follows:
- Authorised invoices
- Rejected invoices
Authorised invoices
- All the invoices which user has already authorised will be displayed in this section.
- User can click on See All button to view all Authorised invoices and its detail page.
Rejected invoices
- All the invoices which user has already rejected will be displayed in this section.
- User can click on See All button to view all Rejected invoices and its detail page.
- UNDO: It can even perform a UNDO action of rejected invoices so documents are sent one step back to authorisation stage.

B. Confirmed
- Confirmed history section are divided into two sub-section as follows:
- Confirmed invoices
- Rejected invoices
Confirmed invoices
- All the invoices which user has already confirmed will be displayed in this section.
- User can click on See All button to view all Confirmed invoices and its detail page.
Rejected invoices
- All the invoices which user has already rejected will be displayed in this section.
- User can click on See All button to view all Rejected invoices and its detail page.
- UNDO: It can even perform a UNDO action of rejected invoices so documents are sent one step back to confirmation stage.

11.Profile
Click on the “profile” tab.
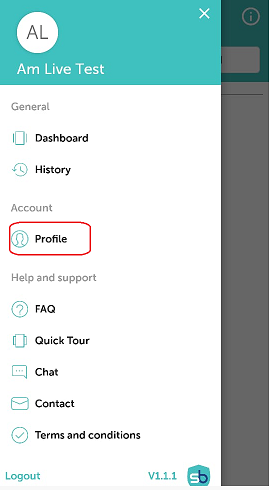
In the profile screen you see the following:
- User data
- Change language
- Change PIN code

- Change language: You can change the language preference. The app is available in English and Dutch.
- Change PIN code

To change the pin code of the app follow the steps below:
- Click on change pin code.
- Click on “Enter the current PIN code”.
- Click on ‘Enter the new PIN code’ that you want to set.
- Confirm by entering the same pin code again.
12. Chat
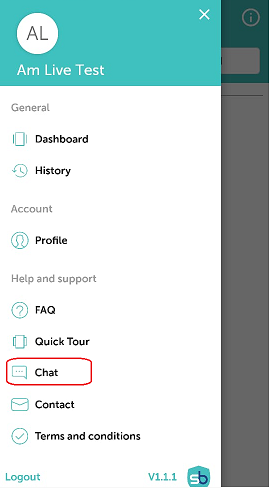
- You can find access to the chat function in the main menu.
- Click on “start chat” and you will be connected.

- Send message: Type your question and send your message.
- Actions: Click on + to add an action.
- Take a photo: Clicking on the photo opens the camera of your phone.
- Photo gallery: You can select images from the phone’s photo library.
- Take screen capture: Allows you to take a photo of the screen. A camera icon appears and by clicking on it you capture the screen. The screen capture is saved in your photo library.
- End session: The chat will be closed when you click this.
13. Menu

Click on the menu symbol on the left; the following tabs can be seen:
- Dashboard- Over view for pending document of all administration
- History- Document which are already Authorised/ confirmed/ rejected.
- Profile- Can view you personal details, change language, change PIN
- FAQ- View frequently asked questions
- Quick tour- Get a quick glimpse of the application.
- Chat- Get in touch with Smartbooqing in-case any query.
- Contact- Email us at support@smartbooqing.com
- Terms and Conditions- View terms and conditions.
- Log out