In this article you will find information about:
Rules in Authorisation:
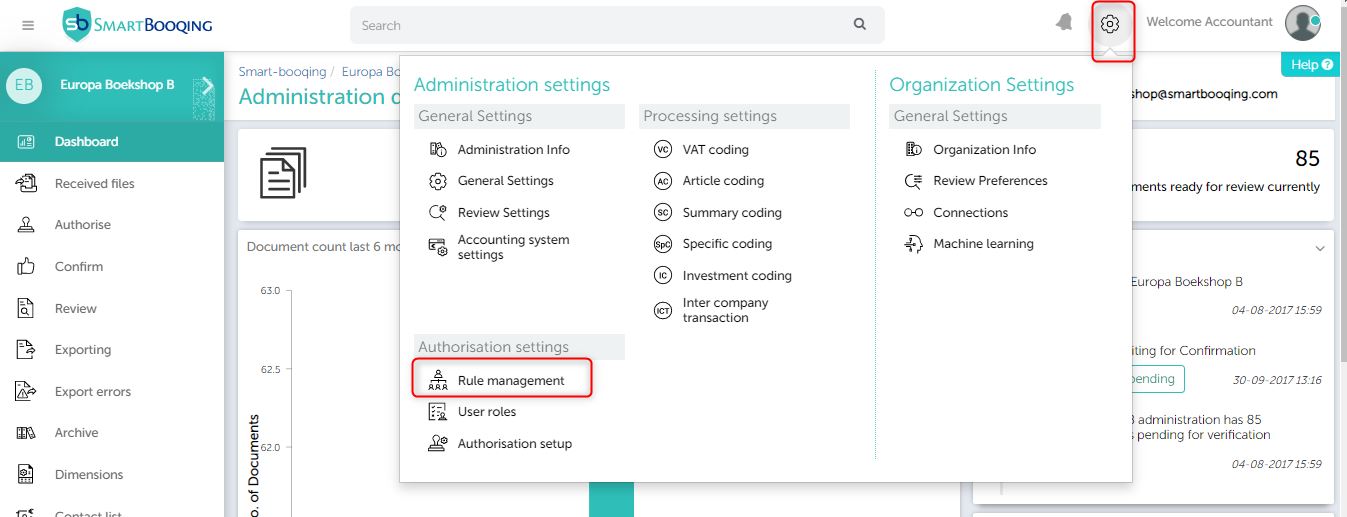
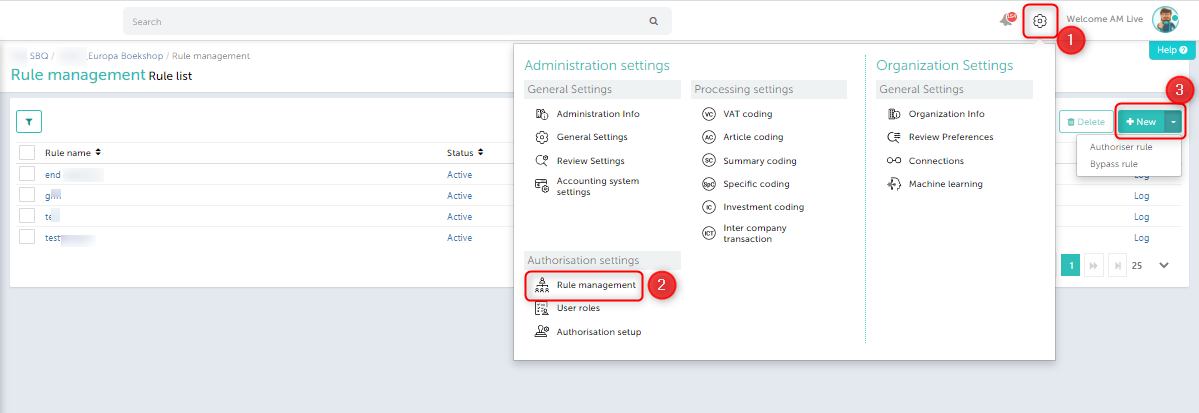
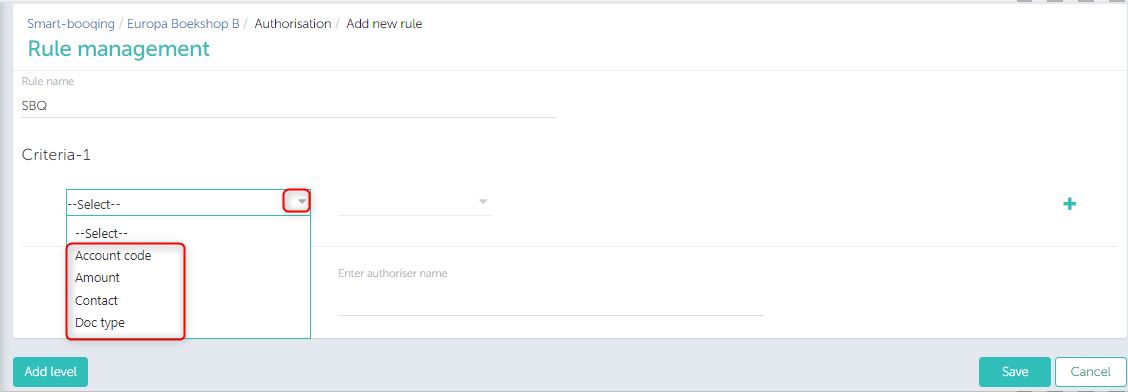
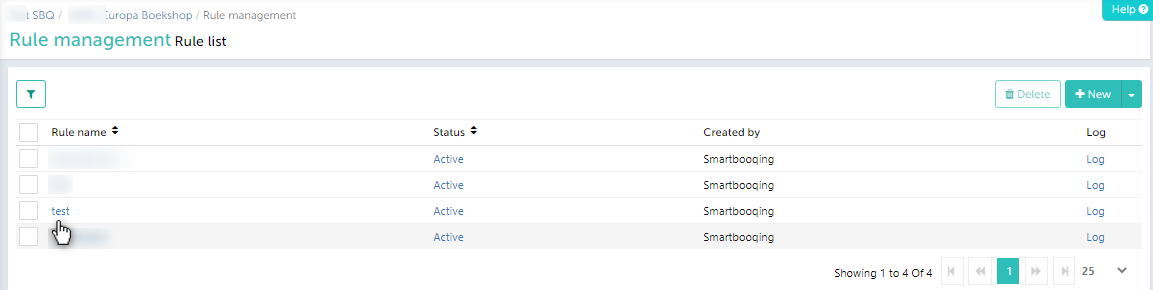
- As shown in the below image you can go to the Authorisation settings, (‘Authorisation’ >> ‘Rule management’ >> ‘+New’). Clicking on the ‘+New’ button you can set up a new rule.
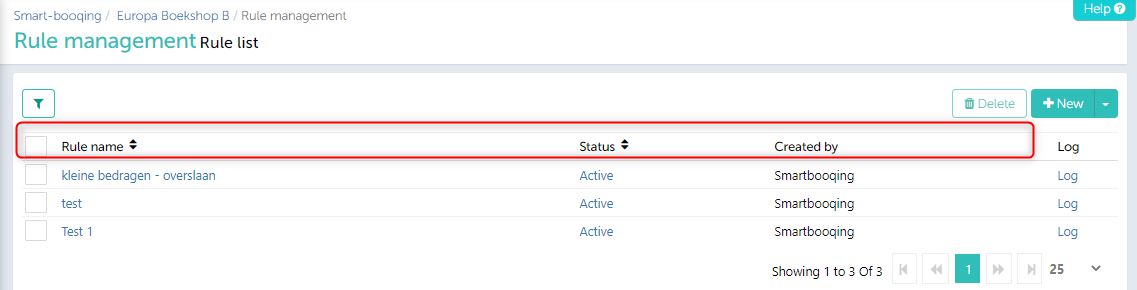
- You can see who has created rule.
- There are two types of rules which you can set–
- Authoriser Rule – All the invoices that meet the rule criteria will halt in the Authorisation for review. Documents failing this rule will directly go to the ‘Confirmation’/ review page stage in the Authorisation.
- Bypass Rule – All the invoices, falling in this rule will be bypassed from the Authorisation.
1. Authorisation rule
- All of the invoices which satisfy the rule will come to this section and user can take the actions on the invoices from ‘Authorise’ section.
- Click on ‘+New’ button and select authorise rule.
- You can add maximum 5 levels.
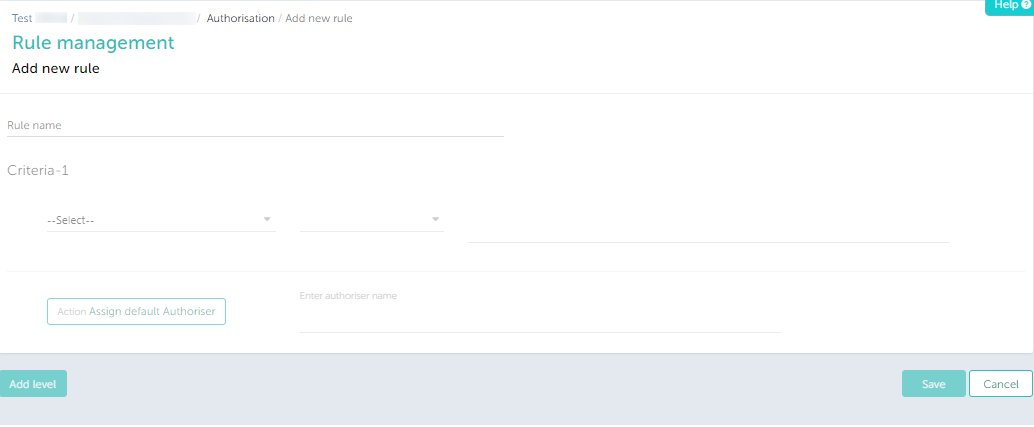
How to set up authorisation rule?
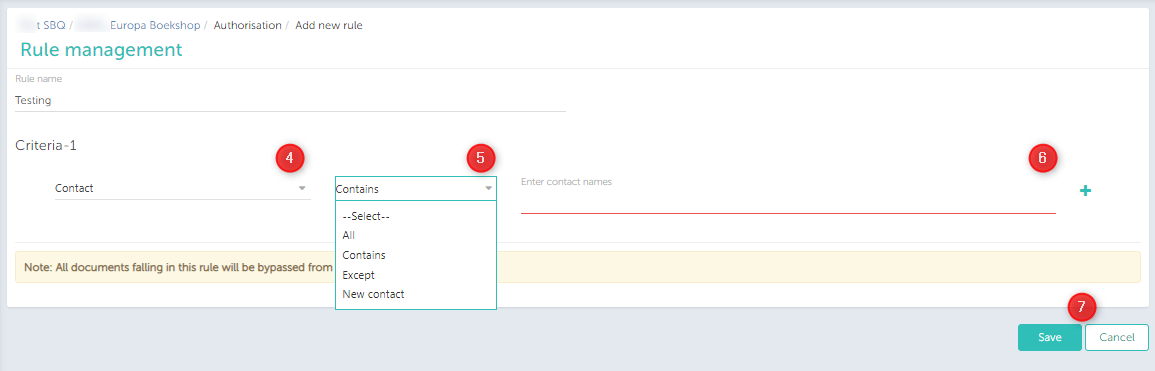
- Mention a name that you would like to set for the Rule
- In the criteria drop down you have 4 options: ‘Contact’, ‘Account code’, ‘Amount’, ‘document type;. Select the one as per your requirement.
- Enter the Authoriser’s name, who can authorise these invoices/documents. The authoriser needs to be assigned the authorisation role.
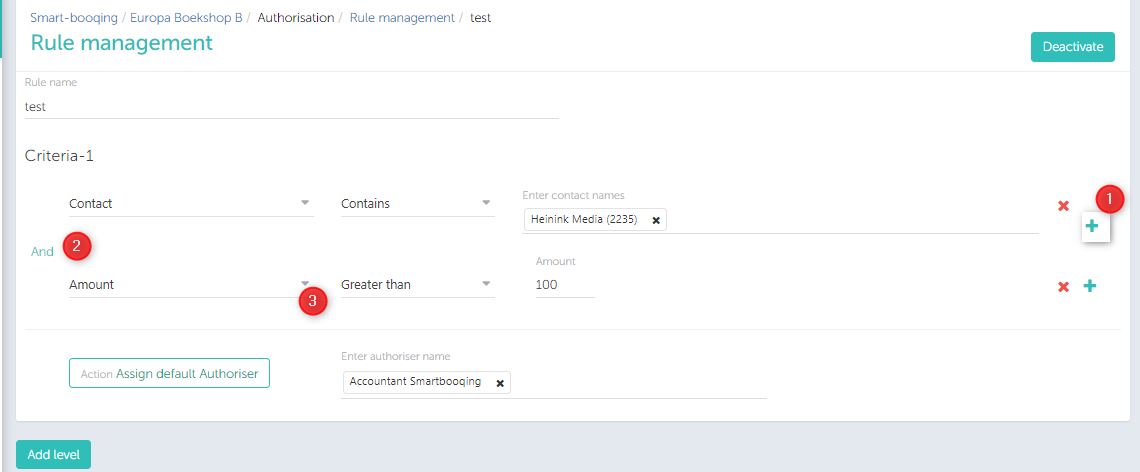
Note: If you assign more than one authoriser then all the authoriser that you have mentioned while setting the rule will have to authorise the invoice and then only it will go to confirmation/ review stage. - If you want to add more conditions for one rule, use AND. Click on “+” symbol and from the drop down select the option and set it.
You have the below parameters for each option as:
Contact- (‘All contacts’, ‘Contains’ or ‘Except’ the given contact)
- ‘All contacts’- With this option it will consider the rule for all the contacts, existing and newly added both.
- ‘Contains’- With this option, rule will be considered for the given contact only
- ‘Except’- with this option, rule will be considered for rest all contacts except the given.
Amount- (‘Greater than’, ‘less than’ and ‘Between’)
- ‘Greater than’- All documents where amount is greater than or equal to the mentioned value will stop under this rule.
- ‘Less than’- All documents where amount is lesser than or equal the mentioned value will stop under this rule.
- ‘Between’- All documents where amount is between the mentioned range will stop under this rule.
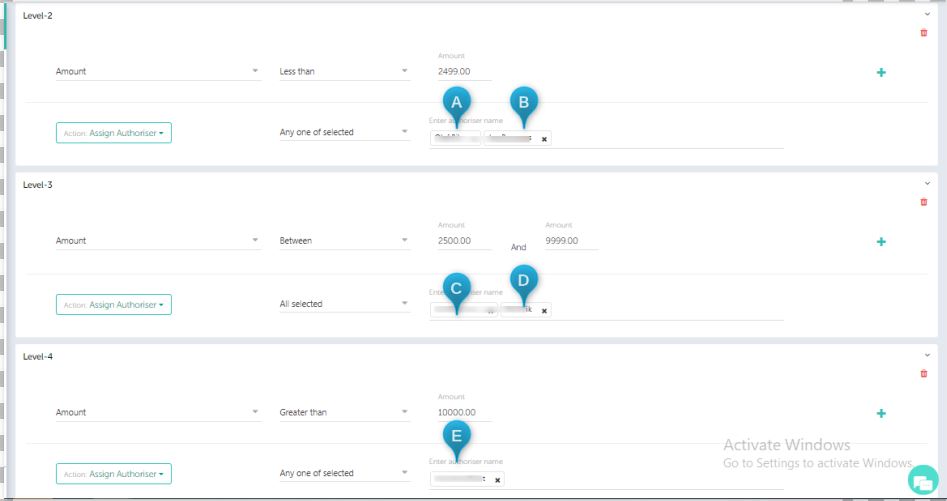
As shown in the above image, if you want documents > 1000 to be authorised by user E , documents less than 2500 to be authorised by users A and B, and documents between 2500 to 10000 to be authorised by users C and D.
Account code- (All account codes, Contains or Except the given account code)
- ‘All account codes’- With this option it will consider the rule for all the account codes
- ‘Contains’- With this option, rule will be considered for the given account codes only
- ‘Except’- with this option, rule will be considered for rest all account codes except the given.
Document type (All documents, Contains or Except the given document type)
- ‘All documents’- With this option it will consider the rule for all document types, Sales, Purchase an Miscellaneous.
- ‘Contains’- With this option, rule will be considered for the given document type- Sales / Purchase/ Miscellaneous
- ‘Except’- with this option, rule will be considered for rest all document type except the given.
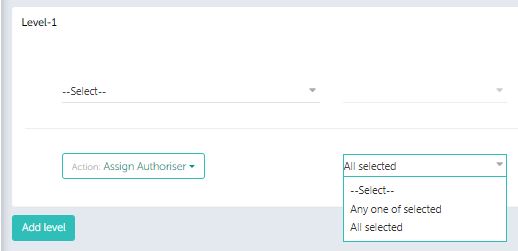
Assign an authorisation.
- ‘Any one of the selected’: Any one of the authorisers mentioned can authorise it.
- ‘All selected’: All the authoriser will have to authorise it.
- ‘By pass level’: If you want to skip any level then other levels will not be considered and directly document will go to Confirmation or Review page.
‘AND’ condition usage:
- Using AND, you can to satisfy both the conditions for Authorisation.
- If ‘AND’ is selected between two conditions, the system will check if both the conditions are fulfilled, if yes, then only the invoice will be considered for Authorisation
- Invoices which does not satisfy both the conditions, will go directly for Confirmation or Review page.
Precedence of Criteria-1 and Level-1
You first create a basic level criteria, with an authorizer. This is where the document only goes if it doesn’t qualify for level1. Then you give a level-1 criterion, a level-2 and possibly level-3.
Each level is a subset of the previous criteria.
Please refer to the example given below,
Example1:
Rule: Amounts
- Criteria-1: Everything > 1000.- authorization by Peter.
- Level-1: Everything > 1000, – authorization by Chris (so nothing goes to the Criteria-1 flow, to Peter)
- Level-2: All > 5000, – authorization by John.
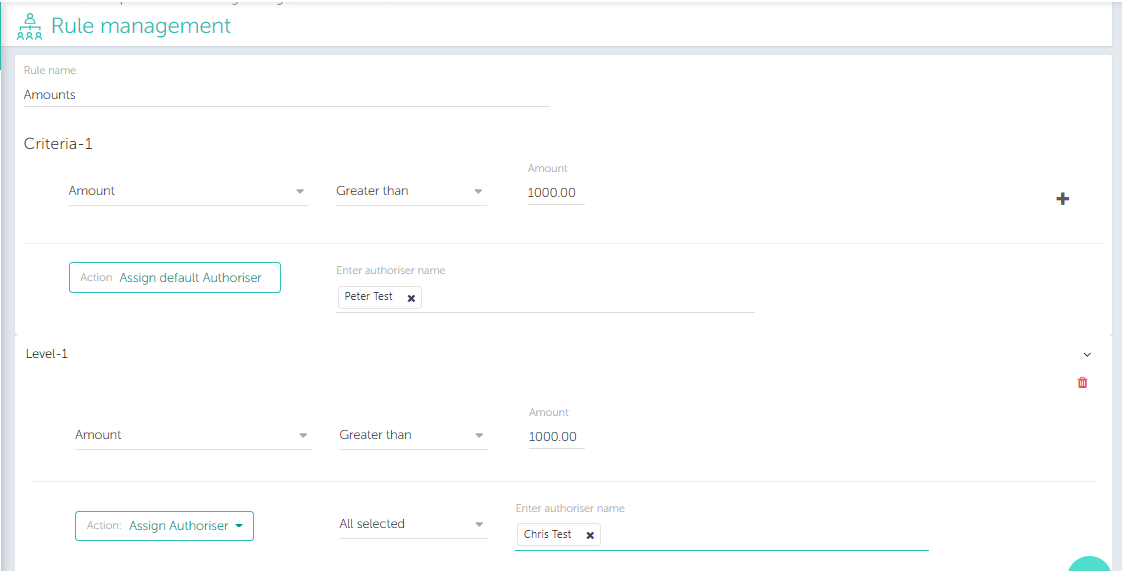

Then a doc of 2000, – will confirm Level 1 criteria (Chris) and then continue (to confirm or review).
Then a doc of 12000, – will confirm Level 1 criteria, Level 2 criteria (Chris, then John), and then continue (to confirm or review).
Example2:
Rule: Amounts
- Criteria-1: All > 1.- John
- Level-1: Everything > 1000, – Peter (so all invoices < 1000, – go to the basic criteria John)
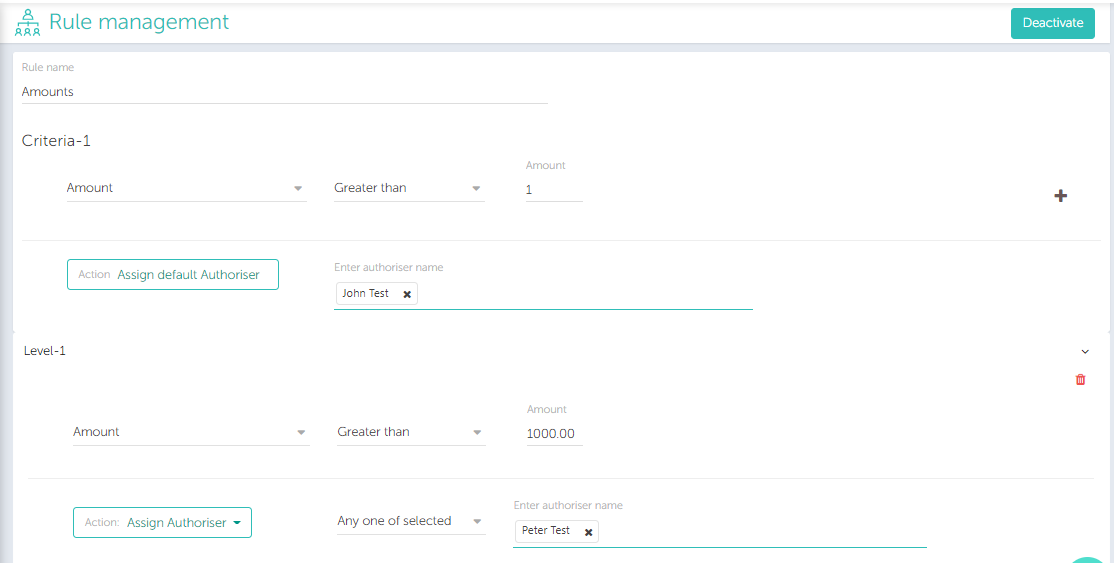
Invoice of 500 will go to – John.
Invoice of 1500 will go to – Peter.
2. Bypass Rule- How to ‘Bypass’ a rule?
- While setting up this rule, you can click on the drop down option and select the ‘Bypass rule’ option.
- As shown below, you can set up a rule by giving the criteria for it, same as of Authoriser rule above and the invoices for this rule will be automatically Bypass the Autorisatie section and directly go to Review Page.

Note: All invoices falling in this rule will bypassed from Autorisatie. They will follow the normal Smartboqoing flow, wherein they will come for review directly.
Multiple rules:
You can create multiple rules.
1) Rule: Amount (based on amount)
2) Rule: Telecom costs (based on relations)
3) Rule: Canteen expenditure (based on Ledger Account)
Multiple rules:
Then it is possible that an invoice goes through several rules. Invoices go through multiple rules from top to bottom.
With a drag & drop, you can change the order of rules.
3. How to edit a rule?
To edit a existing rule you can click on the relation name and make the changes.
Note: The changes made will be reflected in the invoices that come in for processing after this rule is set.