In this article you will find information about:
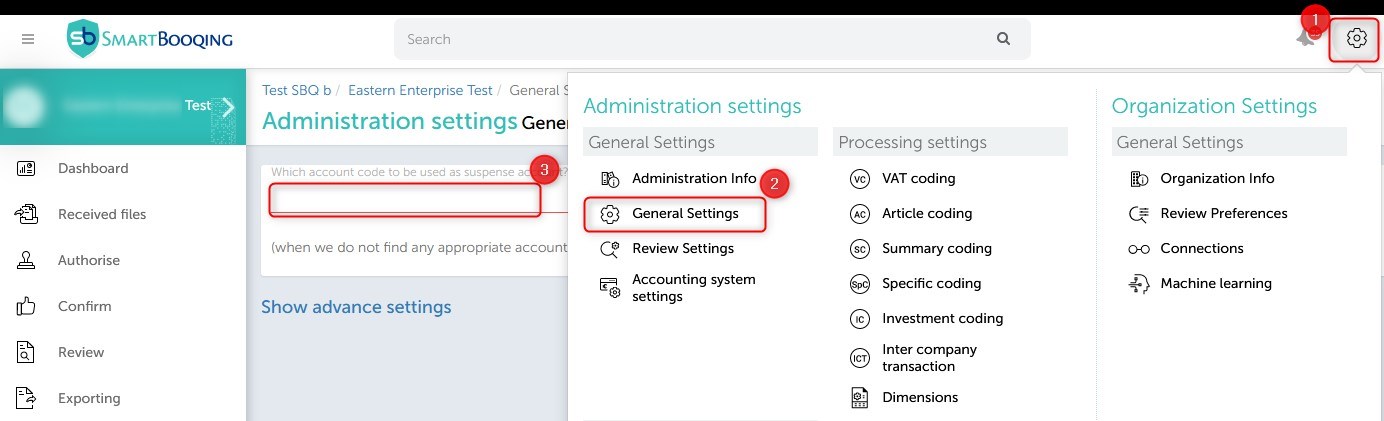
1. Basic Settings:
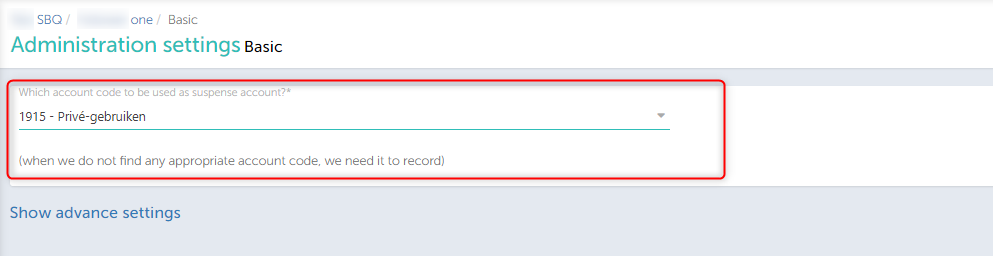
Suspense account: By default; system will suggest this code. When system does not find any appropriate ‘account code, then this given ‘account code’ will be used to book. This code is mandatory in Smartbooqing.
2. Advance Settings:
2.1. VAT and tax settings:
- Vat – Some administrations having exempted vat from government like insurance companies etc. This option helps to make switch ON / OFF vat calculation from all invoices
- Tax – Some administration book tax invoices as purchase document and then pay by bank/cash, some want to book directly in bank/cash book. This setting helps to decide whether it should be booked as Invoice or non bookable for tax documents.
2.2 Round off amounts:
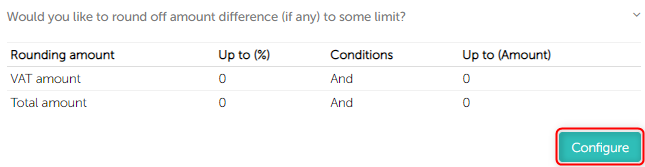
System generates alerts for minor amount differences (i.e. 0.1) as well, to avoid this you can set ‘how much amount’ difference needs to be adjusted automatically. This can be set for two amounts on ‘Total amount’ and on on ‘Vat amount’. Following criteria can be applied.
- Percentage of amount OR upto given amount = Amount difference will fit any of them will get adjusted
- Percentage of amount AND upto given amount = Amount difference will fit in both will get adjusted
2.3 Suppliers default settings: or Customers default settings:

By clicking the ‘configure’ button, you can do the below settings-
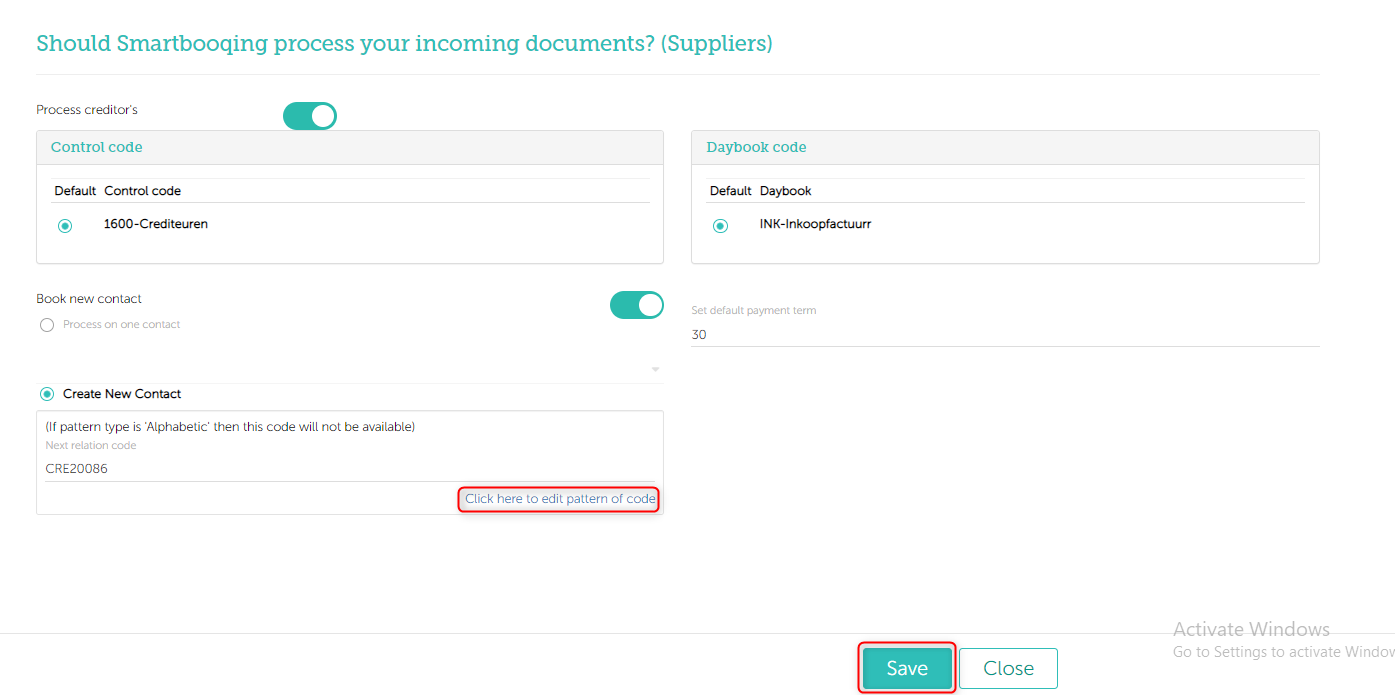
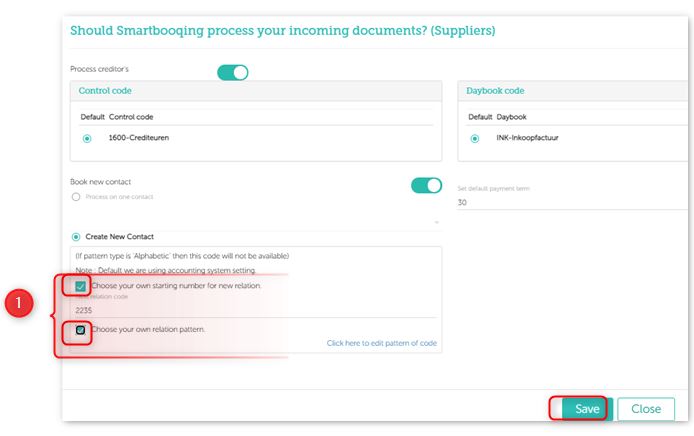
- Process creditors – If its ON then other settings are visible and applicable, if its OFF then purchase invoices will not be booked.
- Control codes / daybooks – There can be multiple but by default one will get selected as per accounting system settings
- Process new creditors – If this is ON, then new creditors will be created and booked, if its OFF then only existing creditors will get processed.
- Payment term – It get synced from accounting system or get set as 30 by default
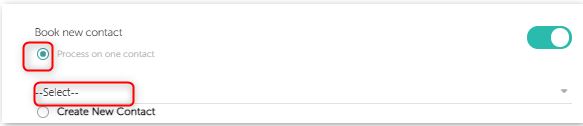
2.3.1 Process on one contact
When you don’t want new relations to be created by system and want to book documents on one contact.
2.3.2 Setting Relation pattern and next number
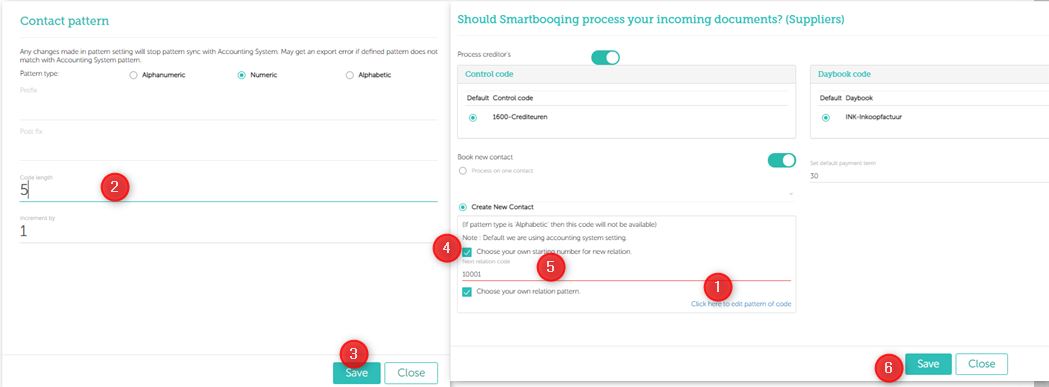
- Relation created in Smartbooqing are determined by the setting in Accounting System (AS). By default, this is synced from AS, in case you want to set your own pattern to avoid overriding of relation number you can define the number here.
- By default, both checkboxes will be OFF:
- If 1st checkbox selected – You can mention start number for new relations.
The sync with Accounting system will continue, if in your Accounting System there is a relation present which is greater than this number than this number will get changed after sync.
Example: if you have set 8027 as the start number. If in your Accounting system there is a relation number say 10000, then after admin is synced in Smartbooqing, the start number of relation will change to 10001.
- If 2nd checkbox selected –
Here you can change the relation length and the pattern, based on this the next number will be generated. - Note: When this option is selected, relation pattern sync will stop with Accounting System and will not get updated because of sync.
If relation length or pattern is selected here is incompatible to Accounting System, then relation will stop on export error page.Example: You have a relation number 1000000000 in your Accounting system, then as Smartbooqing creates relations based on the largest number present in your system, then after sync Smartbooqing will create relation 1000000001. But if you don’t want this and you want next relation number to be created as 10001, then you can select the relation code as 5 and adjust the next available number to 10001. See below image for reference.
Note, when both the check box is selected, then system will create relation number according to the number set and will not get changed after sync.
- Note: This feature is not supported for VISMA connections as relation numbers are exported correctly in VISMA.
- Note: The below changes only for numeric and alphanumeric pattern setting. Not required for ‘alphabetic’ pattern setting.
2.4 Master data (view):

Here you can view all master data mentioned in screen. i.e. for periods you can see which periods are open and which are blocked.
2.5 Close booking period:

Some invoices coming under a closed or blocked period, i.e. invoice date falls under closed period, then this setting will decide whether they should be booked or not.
- If its ON then it will be booked for same invoice date in next open period.
- If its OFF then it will not be booked
- It will also has text [VP] in description which stands for “Vorig period”
- System will generate alert for both – booked or not booked document.
2.6 Description creation:
-
-
- If the default setting is not correct user can select “Custom” to edit settings.
- This is the setting for description pattern of header part and article line, to be exported. Its based on length of each field, start from. It will generate combination of fields in one field.
- In article line – there are two parts of description. Its depend on relation setting “Group booking”. If Relation set as Grouped lines then that setting of description will get applied otherwise Non grouped setting will get applied. See screen below.
- An alternate option you can manually edit the description from the invoice detail page (IDP) it will overrule the description set in the settings and the new description will be exported in your accounting system irrespective of the coding rule.
Please see below the knowledge base link for changing the description from the review page. - Changing_decriptiong_during
-


2.7 Documents with other addressee:
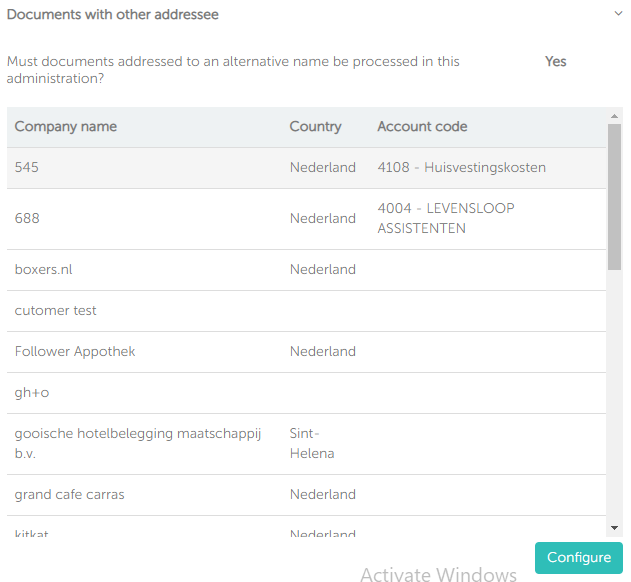
- This setting will applicable on purchase invoices where addressee is not same as per administration. You can set here such names to be booked / not booked / booked on given fixed code.
- System also generates alerts for new unknown addressee, by which it will add in this setting automatically as per user action taken on alert or you can set alert for known addressee as well.
Note: Name, address, should be exact as per invoice, then only the setting will be applied.
2.8 Digital PDF settings:
This setting indicates how PDF will be created from a UBL file.
2. 9. Default (standard) coding rule
2.9.1. Importing administration with a default coding rule
- While importing the administration a default coding rule is set for debtors and creditors for regions (NL, EU and Non-EU).
- The default coding rule set is fixed coding with suspense account codes.
2.9.2. Default coding rules settings for new relationships
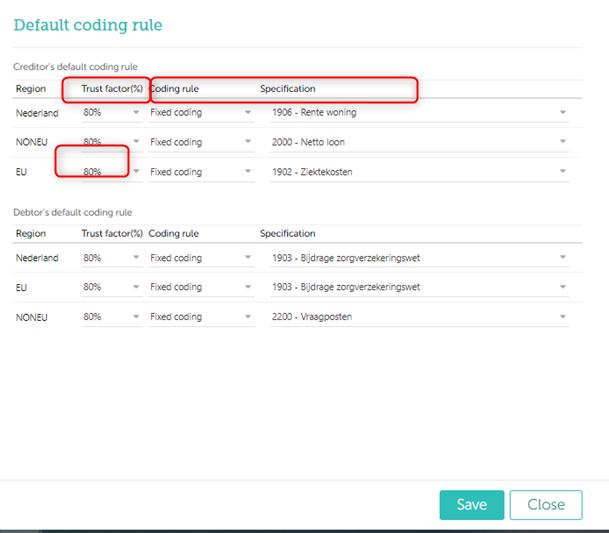
After the administration has been imported, you can adjust the below setting, then depending on the region set when a new creditor or debitor is created, the below set coding rule and specification gets applied.
Note: Set the trust factor percetage to 65% and above, then only the system considers the priority based on this percentage and assigns below set
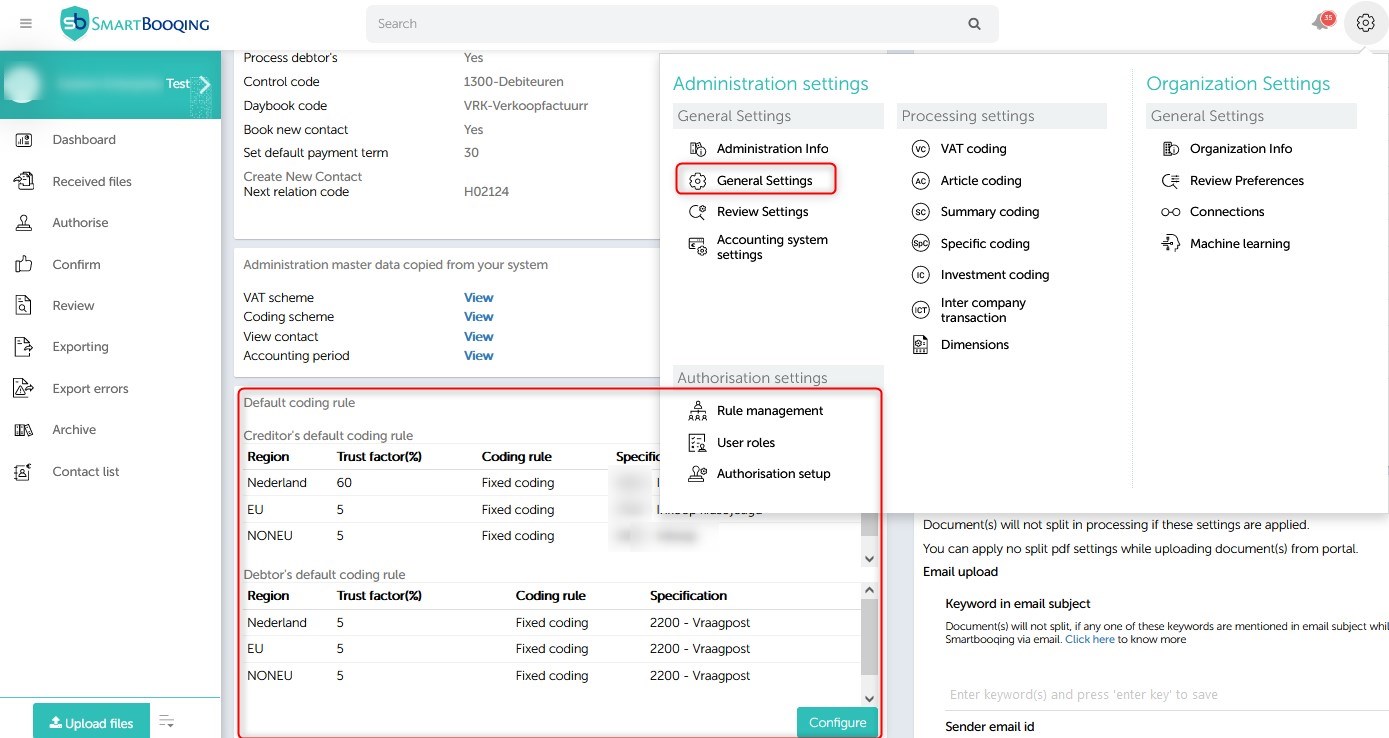
- You can access the default coding rule settings:
- Administration settings > Basic > show advanced settings
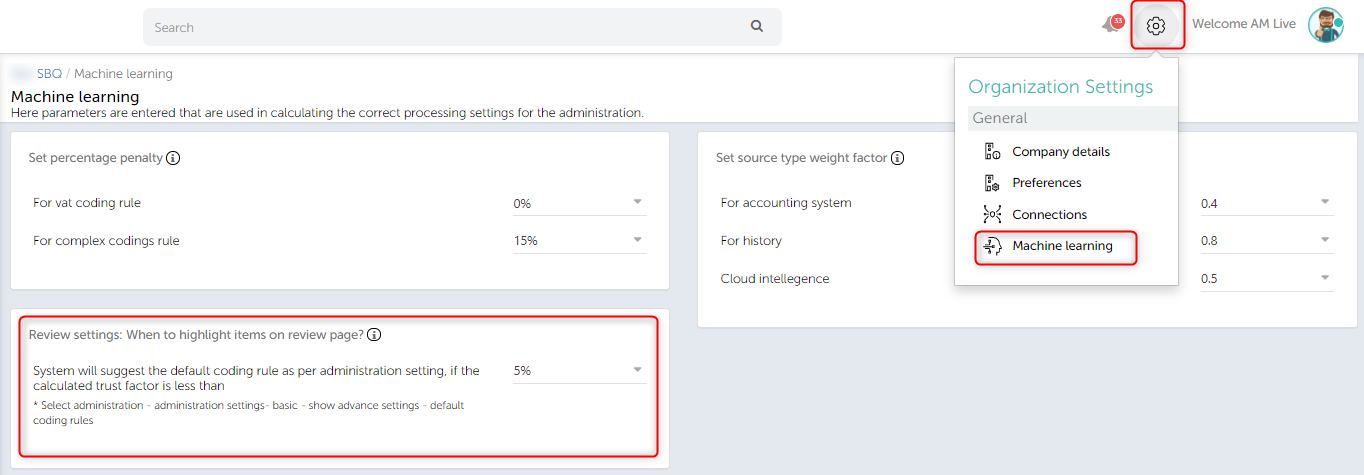
2.9.3. Coding rules and trust factor
- By adjusting the trust factor limit, you can always apply settings or the default coding rules or you prefer the system suggestions. The system will try to make a good suggestion for new relationships based on cloud intelligence. The trust factor (BTF) indicates how strong this suggestion is. If there are few comparable relationships in Smartbooqing, the suggestion will have a low BTF value. A BTF of 80% indicates a strong suggestion.
- With the default coding rules you can set the value for the minimum BTF. If the calculated BTF for a new relationship is lower than the limit set here, the default coding rule is applied. If you want the default coding rule to always be applied, set the minimum BTF limit to 100%.
You can check the trust factor settings in ‘Machine learning’ under Organization settings.
- The account code for the suspense account comes from the code of the suspense account set at the administration level.
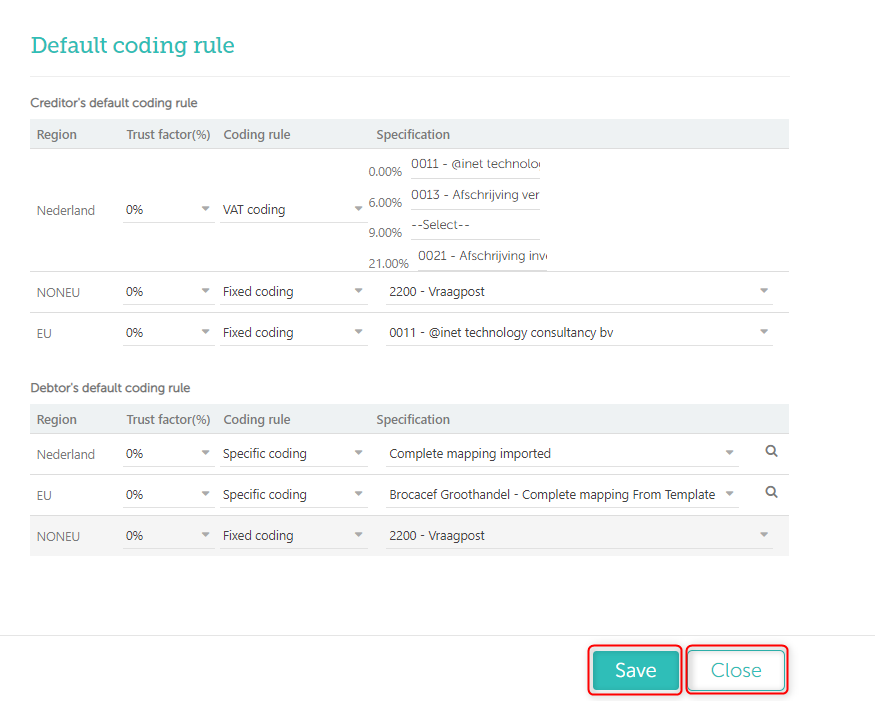
- You can change the default trust factor, coding rule and account codes. Click on “configure” to edit.
- Once changes have been made, click Save.

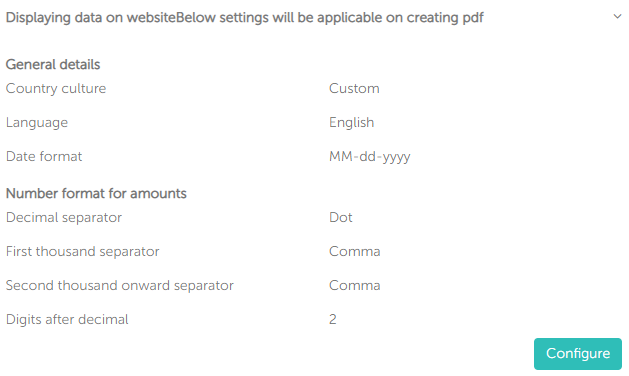
2.10. Export PDF settings
Add document properties to exported PDF. It allows you to add an extra page to exported PDF. This page includes, document timeline events and comments.
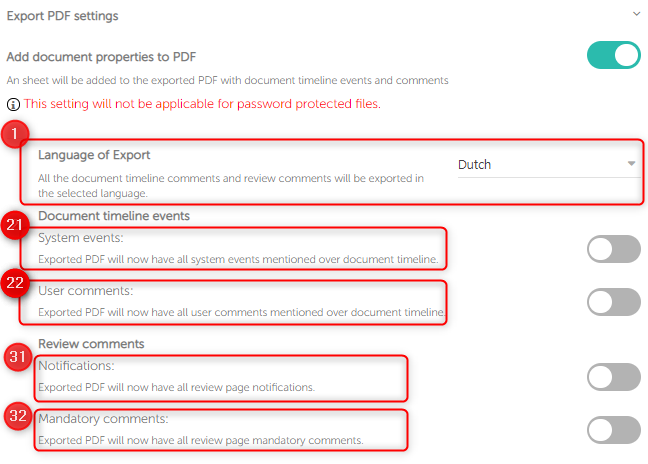
1. Language of export: You can select the language (Dutch/ English), depending on the selected language, exported document properties will be displayed.
2. Document timeline events:
- System events- System generated comments are comments generated by Smartbooqing system and displayed over timeline. The system generated comments will be exported to PDF such as Created, Processing started, Processing completed, Ready for review, Exported, etc.
- User comments- User comments are the comments which are mentioned by user which over timeline. Example while authorising of document user mentions some comment.
3. Review comments:
- Notifications- Notifications are displayed over documents and are mentioned by system. They are displayed with a ‘Blue’ line over documents on review page.
- Mandatory comments- Mandatory comments are displayed over documents and are mentioned by system. These are the comments for where it is must for you to take some or other action as per mentioned comments. They are displayed with a ‘Red’ line over documents on review .
What is document timeline and review comments?
- Document timeline: You can view document timeline from Left menu navigation-> Review page-> IDP-> Timeline
- Document system events
- Document user comments
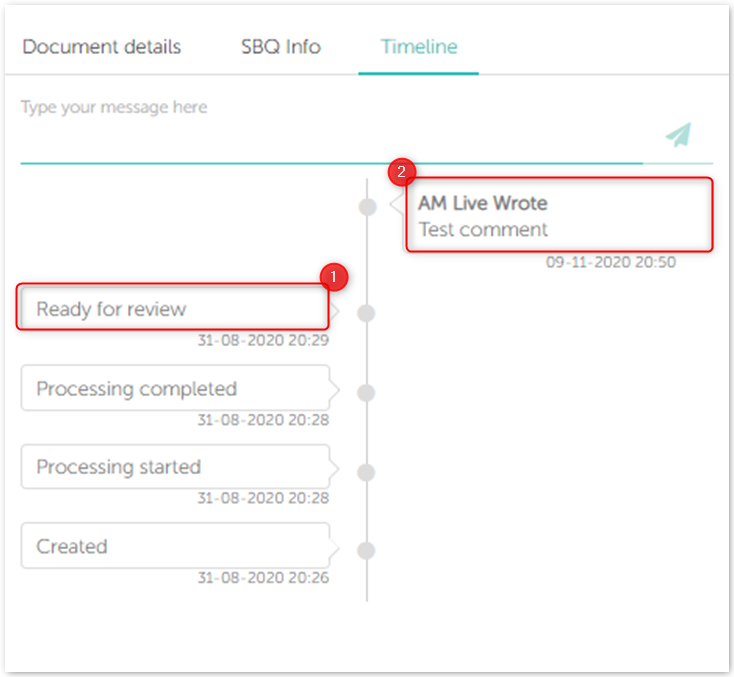
- Review comments: You can view review comments on timeline from Left menu navigation-> Review page
- Mandatory comments
- Notifications

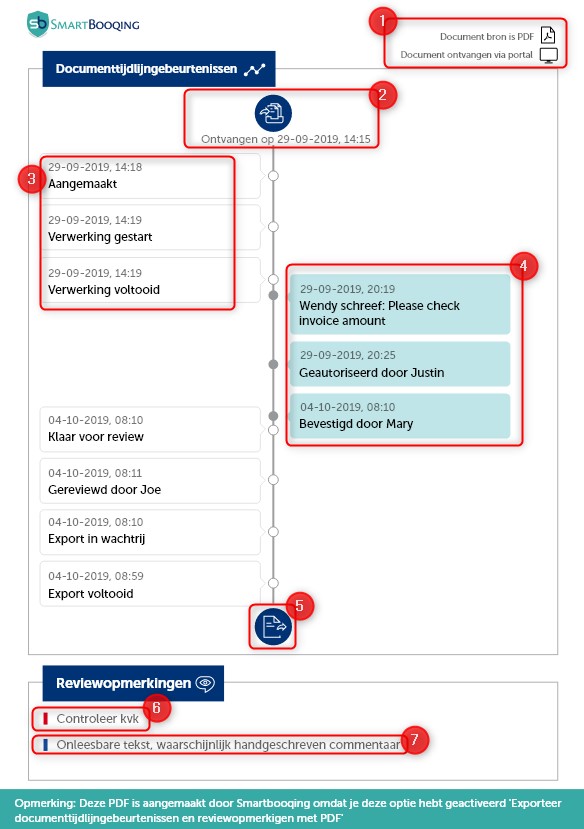
How does the Export PDF page looks like?
This page is appended to your document. Exported pdf page includes the below details:
- Document source and document received source.
- Document received date and time
- System events
- User comments
- Document exported
- Mandatory comments
- Notification
2.11. No split PDF setting
Send files from Email Upload settings:
You can even apply these settings to documents which are sent from email.
Where to adjust the setting ?
Steps:
- Select the administration. Go to Administration settings
- Select Basic, click on Show advance settings
- Right hand side you will find section ‘No split PDF documents settings

Manage your ‘keyword in email subject’ and ‘sender email id’ for no split pdf here.
- Keyword(s) in email subject
- Sender email id(s)
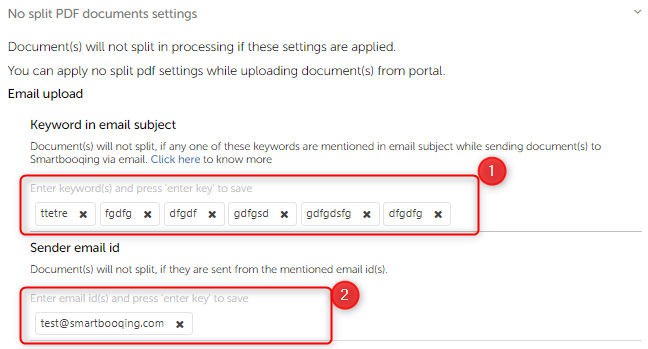
Keyword in email subject
You can define keywords or a sentences for ‘no split pdf’. This setting will be applied if these keywords are a part of email subject while sending documents.
- Type your keywords/ sentence and hit enter key to save.
- To remove email address, click on cross symbol.
- Anyone of the defined keywords sentence should be mentioned as a part of email subject.
- Example: no split factuur 266235
- Where, no split: is the keyword set in the setting factuur 266235: this is the subject line of the email
- Anyone of the defined keywords sentence should be mentioned as a part of email subject.
Sender email id
You can define email ids for no split pdf settings. This settings will be applied on documents received from the mentioned email id(s).
- Type your sender’s email id and hit enter to save.
- To remove keyword click on cross symbol.
- ‘No split settings’ will be applied on all the attached document received from the mentioned email id(s).
Note: ‘No split PDF’ setting, is only applied to an individual scan/file. If you send multiple files and apply ‘No split PDF’ settings, then they won’t be merged into a single document.